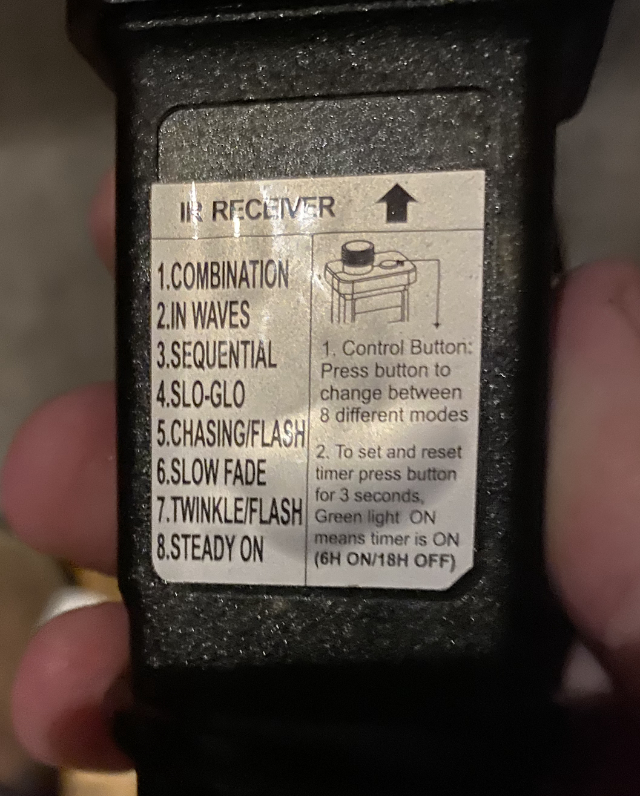
Last year we caved in an got a… multi-season christmas tree. It’s quite convenient and it even came with lights included. There were several programs and not surprisingly I completely forgot what each button on the remote does. It has several modes from an epilepsy-inducing flash-everything-at-once to a our preferred mode which is no blinking, just lights.
It’s IR controlled and the remote is.. not great. The range is abysmal so it isn’t very remote either. It can be best characterised as “regional” if we’re being kind.
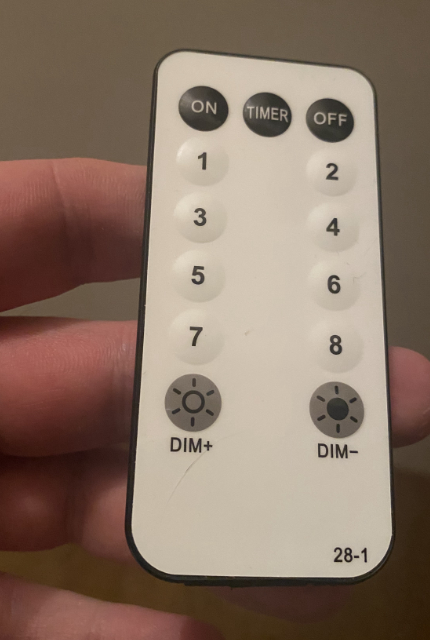
This did of course require fixing. The remote itself looks a lot like other generic IR remotes I’ve gotten over the years so it’s probably using a very standard protocol.
It would have been really nice if there was a way to control the tree via some sort of HomeKit-enabled bridge, gateway or device. That way it would pop up on everyone’s phone and we wouldn’t have to deal with yet another remote.
Decoding the IR commands from the remote
Fortunately there’s a lot of great libraries out there for Arduino so figuring out the protocol was quite simple. Dig around in one of the boxes, find a breadboard and an IR receiver, hook it up to an Arduino and write a quick sketch to decode the signals on the fly. One of the examples from the nice IRRemote library did the trick:
#include <Arduino.h>

// recommended for the cheap VS1838 modules (which is the one I had)
#define MARK_EXCESS_MICROS    20
#define IR_RECEIVE_PIN 4
#include <IRremote.hpp>

void setup() {
    pinMode(LED_BUILTIN, OUTPUT);

    Serial.begin(115200);
    IrReceiver.begin(IR_RECEIVE_PIN, ENABLE_LED_FEEDBACK);
}

void loop() {
    if (IrReceiver.decode()) {
        Serial.println();
        IrReceiver.printIRResultShort(&Serial);
    }
    IrReceiver.resume();
}
The remote is indeed very basic. It uses NEC codes with address set to 0x0 and each button has a command ranging from 0x07 to 0x47.
Sending IR comamnds
Now that we know what commands we’ll need it’s a simple matter of doing everything in reverse. The first test was done in another Arduino sketch, just to make sure it works. This sends the on and off commands repeatedly every 5 seconds:
#include <Arduino.h>

#include <IRremote.hpp>

const uint16_t address = 0;

const uint8_t onCommand = 0x45;
const uint8_t offCommand = 0x47;
const uint8_t repeats = 1;

void setup() {
  Serial.begin(115200);
  IrSender.begin(3, true, LED_BUILTIN);

}

void loop() {
  Serial.println("IR ON");
  IrSender.sendNEC(address, onCommand, repeats);
  delay(5000);

  Serial.println("IR OFF");
  IrSender.sendNEC(address, offCommand, repeats);
  delay(5000);
}
The hardware wasn’t too complicated, just a small IR led connected to pin # 3 on the Arduino with a suitable resistor in between. I did manage to burn out a few LEDs on the way (note to self: Read the spec sheet for the IR led before you amplify the power from the VCC pin on the Arduino) but I had a few extra lying around.
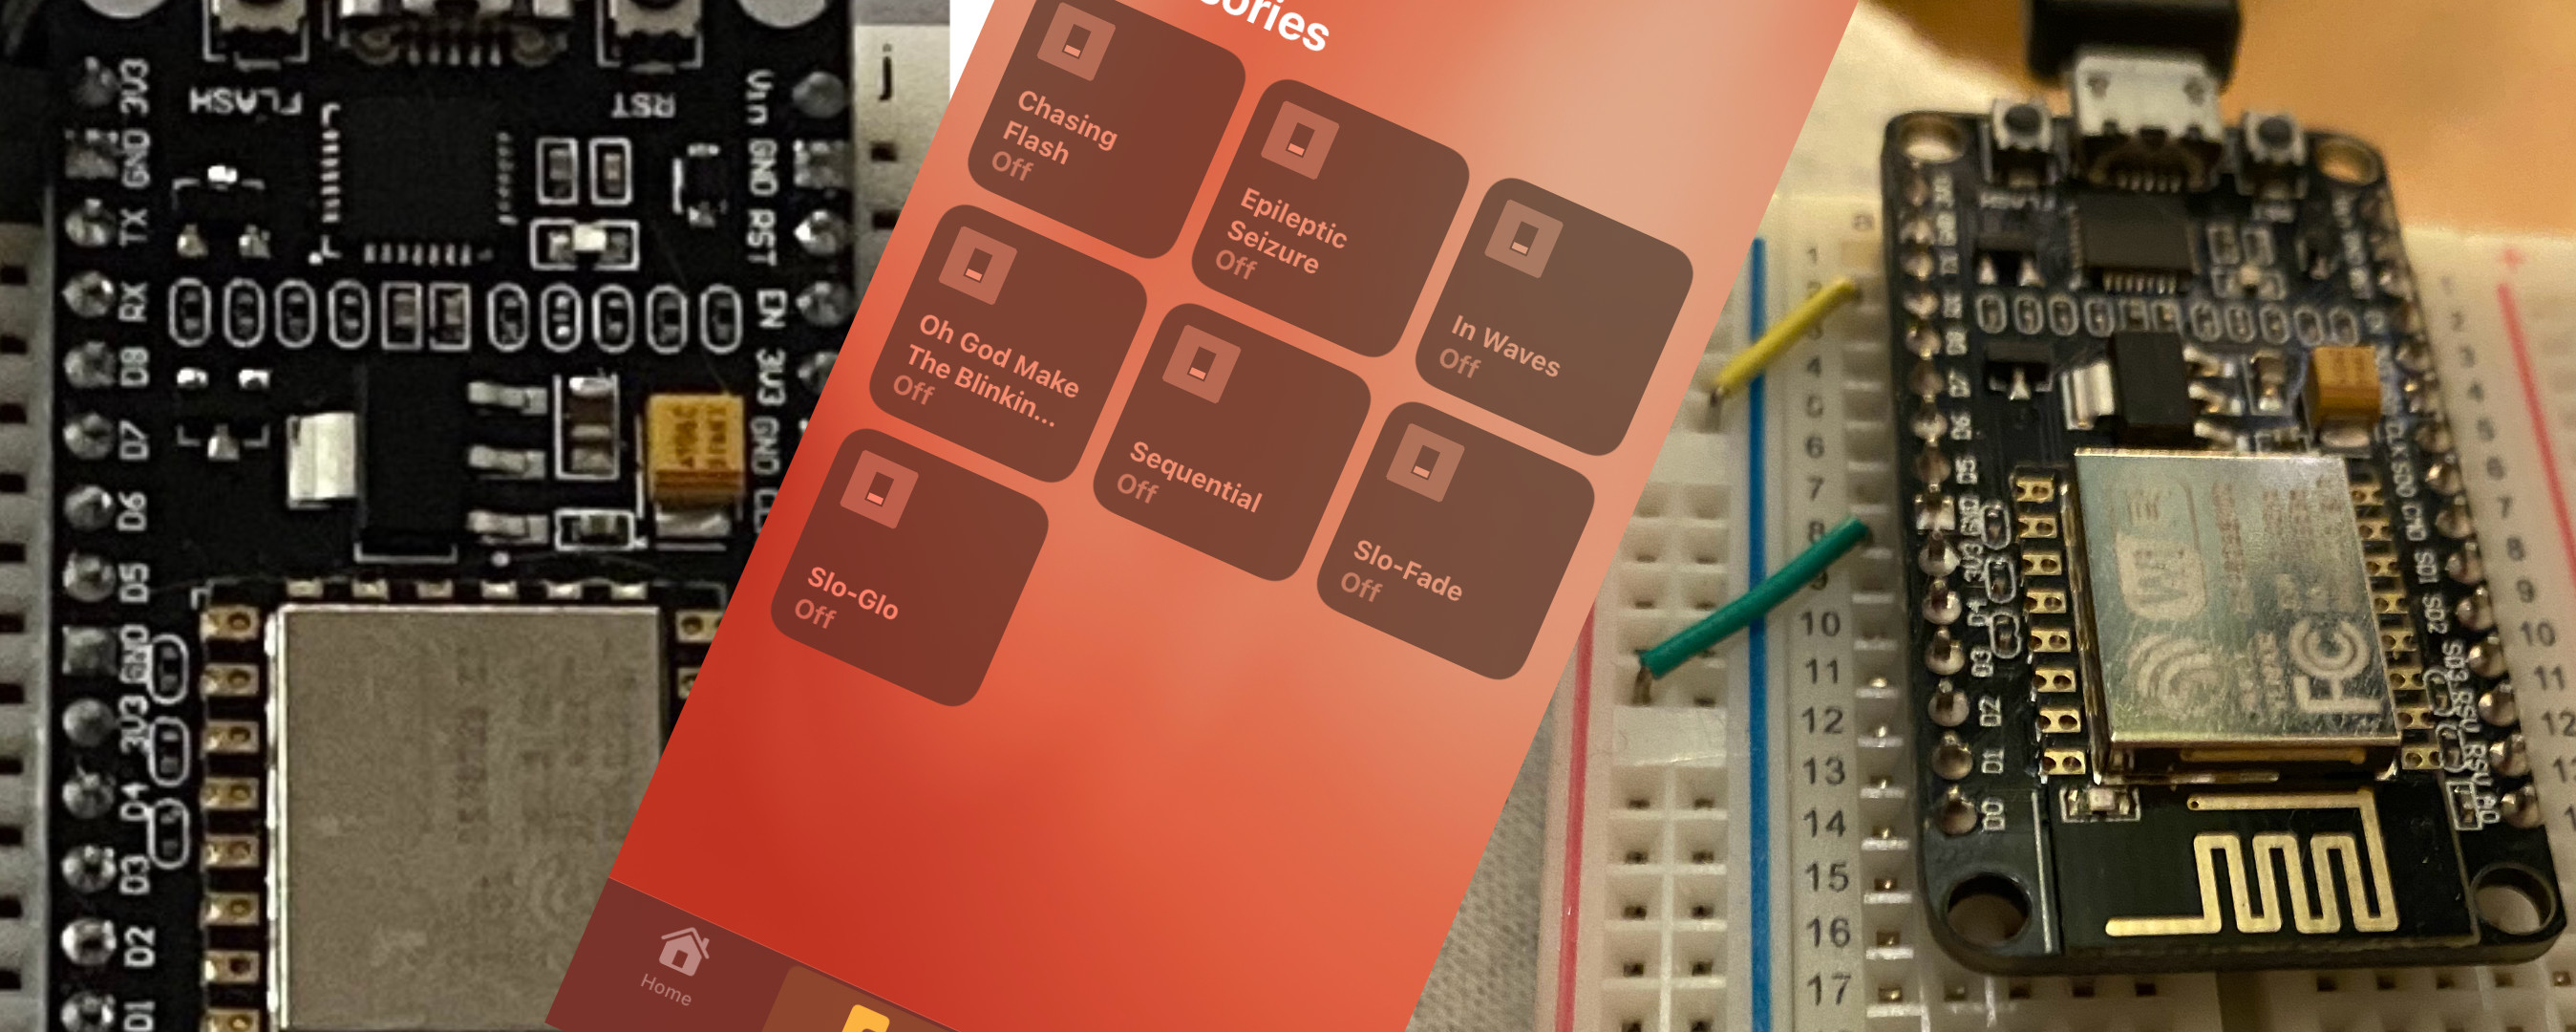
ESP 8266
Now that we’ve got the basics working the next step is to WiFi-enable it. At the bottom of the “things to check out sometimes”-box I had a few ESP 8266 modules. These are really nice to work with and there’s a lot of libraries you can use. PlatformIO is really nice here, just create a new project and you are up and running in a few seconds.
Even better - the ESP framework has support for the Arduino framework so the IRRemote code from the Arduino can be reused with zero modifications so the first ESP8266 prototype was basically the same as the Arduino one. The only change I had to make was to drop the resistor on the pin. Ideally I’d have a resistor but the ESP has a max rating of 32mA on the pins while the IR led is 50mA. The duty cycle for the LED is isn’t too extreme and it seems to be holding up nicely… And it will be used only for a week or two every year.
HomeKit
A quick google for ESP8266 and HomeKit will pretty soon point you to the HomeKit server library for ESP 8266. It’s based on Arduino so there’s little extra ceremony to get a basic accessory up and running – basically a three-liner in the Arduino sketch and a few lines to define the acessory.
HomeKit supports only a few specific accessories, including “switch” which - you guessed it - is a simple on/off switch. There’s no support for stateless pushbuttons like the ones on the remote but I can live with some state in the tree remote; if the state is out of sync it will be in sync once the first remote control command is sent to the tree.
Each button on the remote gets its own switch and when one switch is turned on any other switch that is turned on is toggled automatically. If all switches are turned off an OFF command is sent to the tree.
The accessory is defined like this:
#include <homekit/homekit.h>
#include <homekit/characteristics.h>

void tree_identify(homekit_value_t _value) {
  printf("SantaKit Tree Control (tm)\n");
}

homekit_characteristic_t cha_steady = HOMEKIT_CHARACTERISTIC_(ON, false);
homekit_characteristic_t cha_steady_name = HOMEKIT_CHARACTERISTIC_(NAME, "Oh God Make The Blinking Stop");

homekit_characteristic_t cha_waves = HOMEKIT_CHARACTERISTIC_(ON, false);
homekit_characteristic_t cha_waves_name = HOMEKIT_CHARACTERISTIC_(NAME, "In Waves");

// ....More characteristics...

homekit_accessory_t *accessories[] = {
    HOMEKIT_ACCESSORY(.id=1, .category=homekit_accessory_category_switch, .services=(homekit_service_t*[]) {
        HOMEKIT_SERVICE(ACCESSORY_INFORMATION, .characteristics=(homekit_characteristic_t*[]) {
            HOMEKIT_CHARACTERISTIC(NAME, "Christmas Tree"),
            HOMEKIT_CHARACTERISTIC(MANUFACTURER, "SantaKit"),
            HOMEKIT_CHARACTERISTIC(SERIAL_NUMBER, "47114711"),
            HOMEKIT_CHARACTERISTIC(MODEL, "ESP8266"),
            HOMEKIT_CHARACTERISTIC(FIRMWARE_REVISION, "1.0"),
            HOMEKIT_CHARACTERISTIC(IDENTIFY, tree_identify),
            NULL
        }),
        HOMEKIT_SERVICE(SWITCH, .primary=true, .characteristics=(homekit_characteristic_t*[]){ // mode 8 - old school
      &cha_steady_name,
            &cha_steady,
      NULL
    }),
        HOMEKIT_SERVICE(SWITCH, .characteristics=(homekit_characteristic_t*[]){ // mode 2 - waves
      &cha_waves_name,
            &cha_waves,
      NULL
    }),
        // ...more buttons
The entire implementation is a couple of hundred lines and quite simple overall. Check it out if over on GitHub.. If you aren’t using HomeKit you can use the version with the embedded web server. It’s announcing itself as “santakit.local” on the network so you can point your web browser (or phone) to http://santakit.local/ to control the tree.
Season’s greetings from Lab5e!