Introduction to firmware updates
FOTA (aka “Firmware updates over the air”) is more or less a must-have feature once you get to a handful of deployed devices. In principle it’s fairly straighforward.
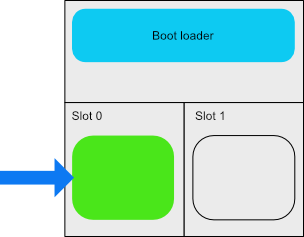
To start off you’ll need partitions on your flash. The setup of those partitions depends on the boot loader implementation but as a rule of thumb you’ll need twice as much flash storage as your image size. There’s some additional blocks on top of that but it’s marginal. Let’s call this slot 0 and slot 1. Slot 0 will always contain the running image while slot 1 has the 2nd image.
When the MCU boots on your device it will load the program at a given flash offset. Normally you’d put your firmware image there but if you are going to do firmware updates you’ll need a boot loader. The boot loader doesn’t do much but to jump to the start of the firmware image in slot 0 and continue executing it from there.
There’s a few tricks up its sleeve though - if slot 1 contains a new firmware image it will swap the two images and start the new version.
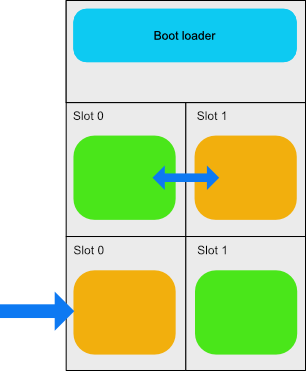
The firmware image itself is responsible for writing the new image to the secondary slot and is quite straightforward; it’s just data from the network.
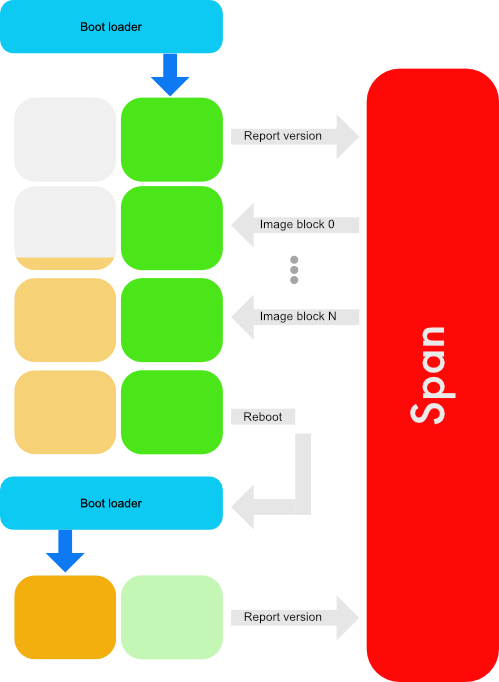
The entire process can be summed up like this:
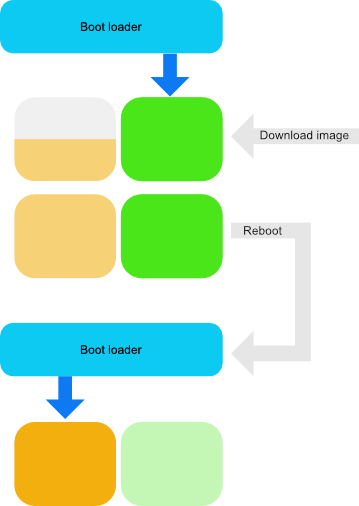
Boot loaders usually adds signature checking (to ensure the images are valid and not tampered with), recovery mechanisms in case an image is invalid or crashes during startup and so on.
A popular boot loader for embedded systems is MCUboot which has both premade boot loaders and uses signed binaries. Installing it involves quite a few moving parts but requires minimal changes to the firmware to work properly.
Span firmware updates
Span (the service at https://api.lab5e.com/span/) implements firmware updates as simple as possible.
The process is quite similar to the simplified process above but there’s two additional steps - reporting the firmware version. This ensures that we can keep track of the versions that are running and only upgrade when there’s a new version available.
A firmware image is the firmware itself. The firmware image is nothing special - just the file you would normally write to the device’s flash.
The maximum image size is currently set at 2MB. If you are going to do updates the images must be versioned. This is set at build time. A nice way to keep track of the version is to use source control tags and use that when building a version.
Each device or collection in Span has an assigned target version and current version of the running firmware. The version is set through version reports. The target version of the device is the desired version and the current version is the version the device is currently running. The target version can be set per device or on the entire collection of devices. Typically you’d manage the firmware version per device when developing and testing.
The device itself controls when a firmware upgrade should be done and at which speed it should be downloaded. Typically you’d report the version every hour or once a day depending on your needs.
Version reporting
The version is reported through a simple packet with TLV encoded values:
| Field ID | Description | Data type |
|---|---|---|
| 1 | Firmware version | string |
| 2 | Model number | string |
| 3 | Serial number | string |
| 4 | Manufacturer ID | string |
The packet format is relatively simple. Each field is prepended with two bytes - one with the field ID and one with the field length, then the data as a series of bytes:

| Byte # | Value |
|---|---|
| 0 | Field ID |
| 1 | Field length (N=0-255) |
| 2…N | Field value |
When the report is received you’ll get a response on the same connection. The response packet is encoded the same way:
| Field ID | Description | Length | Data type |
|---|---|---|---|
| 1 | Host name | N | string |
| 2 | Port number | 4 | 32-bit unsigned integer, big endian |
| 3 | Path | N | string |
| 4 | New version | 1 | boolean (0 = false, 1 = true) |

The host is an IP address if you use cellular IoT and a domain name if you use the internet gateway. The path field contains the CoAP path. This is usually /fw for all firmware images but might be set to something else.
The code to encode the report and decode the response is quite simple and included in the sample program.
If the new version field is set to true there is a new version available at coap[s]://[host]:[port]/[path]. Unless you have a very small firmware image it will be transferred as a CoAP blockwise transfer. It adds a few complicating bits to the transfer but the sample application should be a good starting point.
When doing a FOTA upgrade on a device or collection of devices you’d do the following:
- Build the new version
- Create a new firmware image with the same version number
- Set the new image as a target version for the device(s) you want to upgrade
- Wait for the devices to update.
The device update itself all follow the same common pattern; the new image is downloaded and written to permanent storage in a different location from the current image and when the device restarts the boot loader checks if there is a new version available. If so it will start the new image.
Implementing a simple proof-of-concept on a Raspberry Pi
Just to make our lives a little easier we’ll grab the first and best Raspberry Pi and use that for our sample device. We’ll emulate the boot loader with a shell script. Since we’ve got a file system, a shell and executables that can be relocated to anywhere in memory it’s a lot simpler but in principle a simple boot loader:
#!/usr/bin/bash
while /bin/true; do
    ./fota-sample
    if [ -f image.new ]; then
        mv fota-sample fota-sample.old
        mv image.new fota-sample
    fi
    sleep 30
done
The sample is written in our favourite 50-year old programming language: C. It uses the the mbedtls and libcoap libraries. The CoAP code is identical to the CoAP sample.
Building the sample
You will need make, git and gcc to build it. In addition you’ll need mbedtls and libcoap. Install them with the following commands:
sudo apt-get install git gcc libcoap2-dev libmbedtls-dev
Clone the GitHub sample repository:
git clone https://github.com/lab5e/fota-coap-sample
Then build the sample with
cd fota-coap-sample && make
This will create two files - one name named fota-sample and one named fota-sample.1.0.0. The latter is just for convenience since we’ll juggle several versions of the same binary at the same time.
Create a collection, device and certificate
To connect to the service the program will need a certificate and a key file. Create these with the Span ClI tool:
eval $(span col add --eval --tag="name:FOTA Collection")
Run span col get to show the collection afterwards:
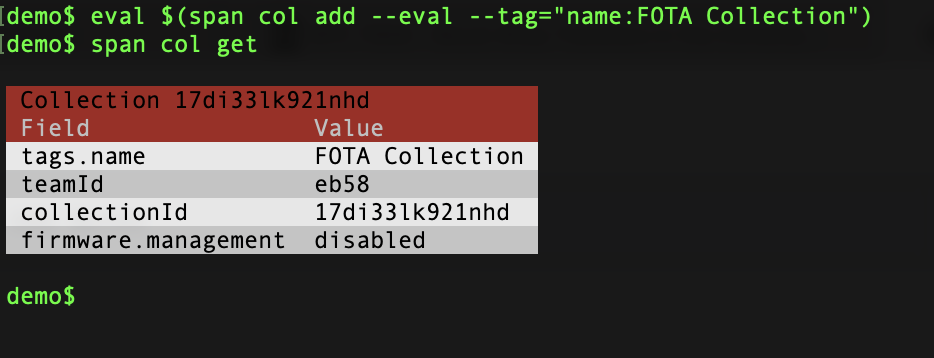
(eval and the --eval parameter sets an environment variable $SPAN_COLLECTION_ID in your shell; this makes our lives easier since we won’t have to use --collection-id)
Next add a device for the Raspberry Pi:
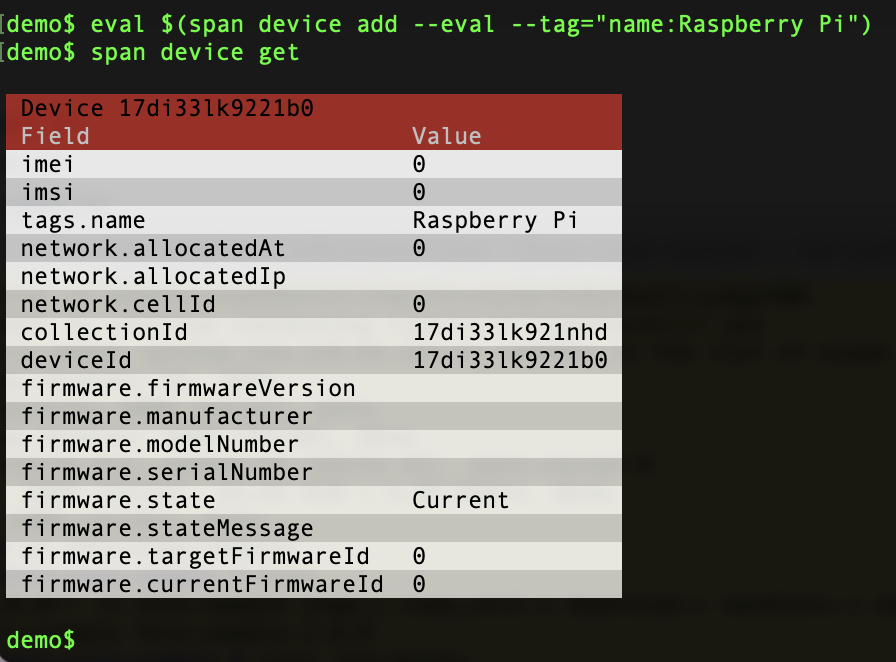
eval $(span device add --eval --tag="name:Raspberry Pi")
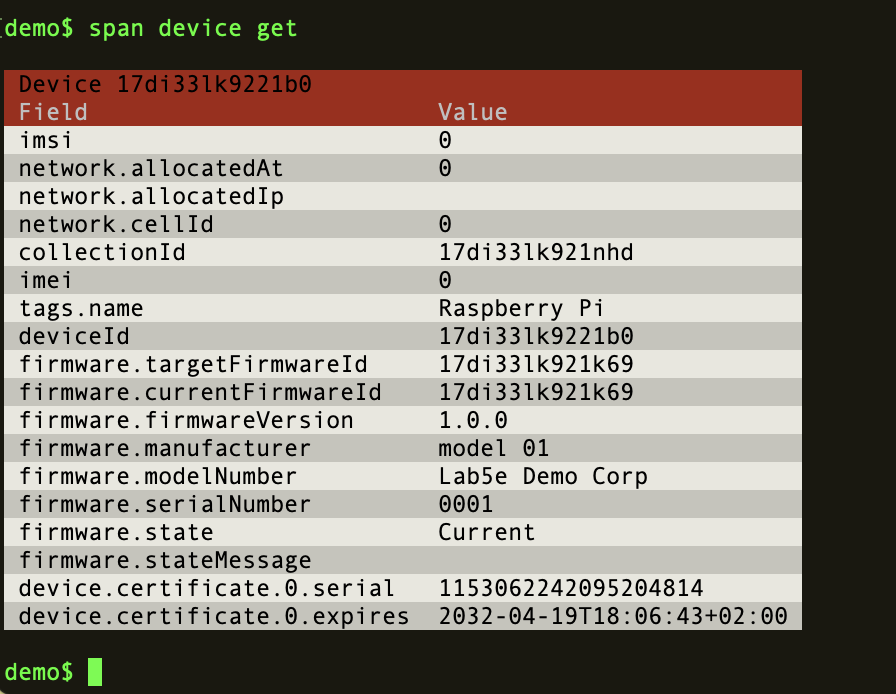
Run span device get to show the device afterwards:
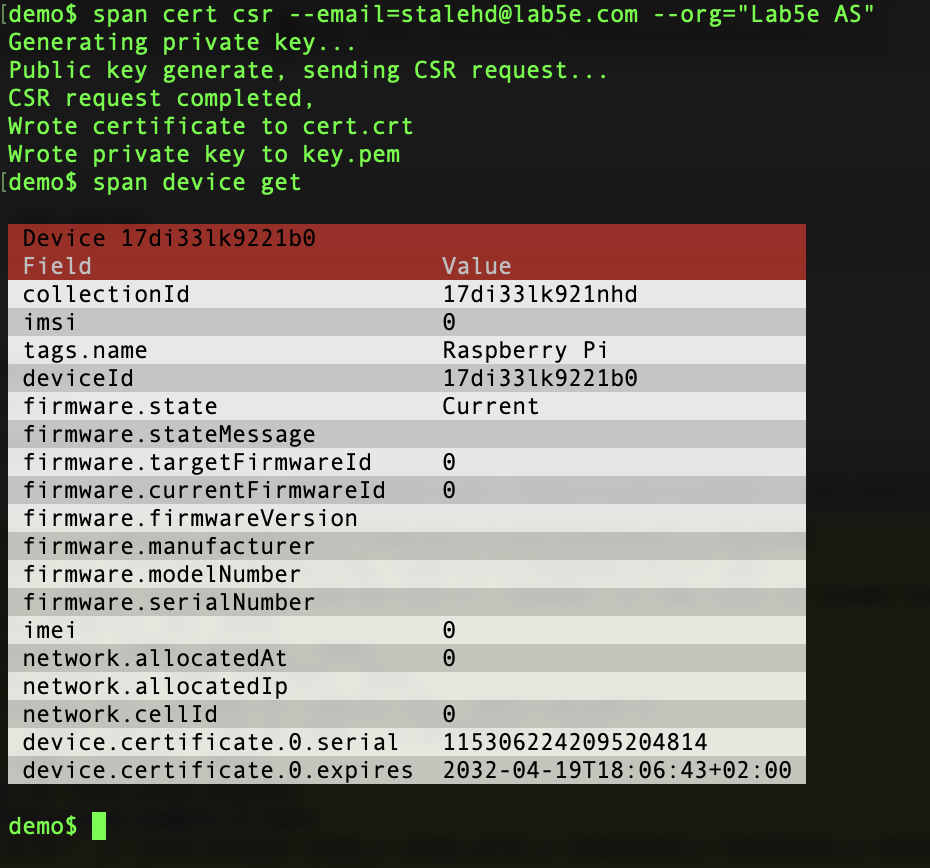
We’ll need a certificate for the device. Create a certificate signing request like this:
span cert csr --email=[email] --org=[org name]
You can verify that the certificate is created afterwards:
Copy the files cert.csr and key.pem to the raspberry Pi if required (I used scp cert.csr pi@raspberrypi:fota-coap-sample/ and scp key.pem pi@raspberrypi:fota-coap-sample/ to move them but it all depends on the name of the Raspberry Pi, the user name and path to the sample).
Enable firmware management for the device
Firmware management must be enabled for the collection. Set firmware management to device on the collection. Each device can now be individually assigned a target version it should use.
span collection update --firmware-management=device
Add a firmware image
Let’s upload an image to Span to match the running version. This isn’t strictly necessary but it’s nice to have a baseline version to use:
span fw upload --image=fota-sample.1.0.0 --version=1.0.0
If you run the Span CLI on a different computer you can copy it from the Raspberry Pi via ssh:

Assign version 1.0.0 to the device with the following command:
span device update --firmware-version=1.0.0
If you run the fota-sample program one more time and inspect the device via the Span CLI you’ll see that it’s now running with the correct firmware version:
Update the firmware via Span
Let’s try an update entirely through firmware updates. Launch the emulated server by running make device. This will emulate a device with a boot loader; every 30 seconds the sample program is started and if there is a new version it will be used. The output should like this:
$ make device
gcc -DVERSION=\"1.0.0\" \
    -o fota-sample coap.c coap_util.c download.c \
        handlers.c main.c reporting.c resolve.c \
        -Wall -g -l coap-2-openssl && \
        cp fota-sample fota-sample.1.0.0
FOTA demo client, version: 1.0.0
No new version available
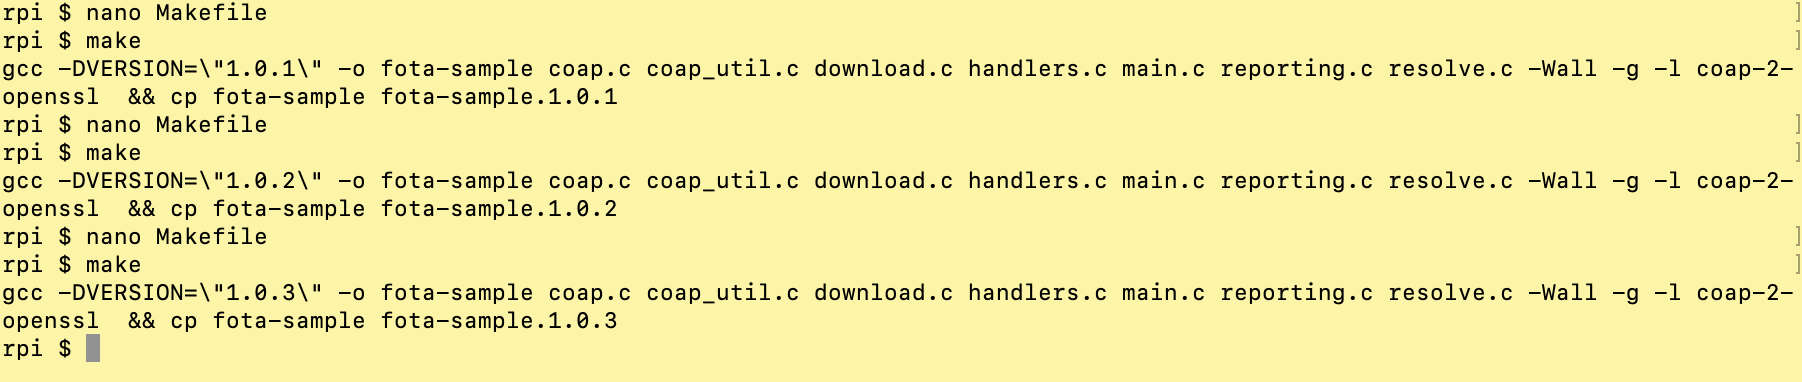
Open a new ssh session to the Raspberry Pi and edit the file Makefile in the project and build a 1.0.1 version of the firmware. Change the version line like so and run make afterwards:
VERSION=1.0.1
Build several versions at the same time:
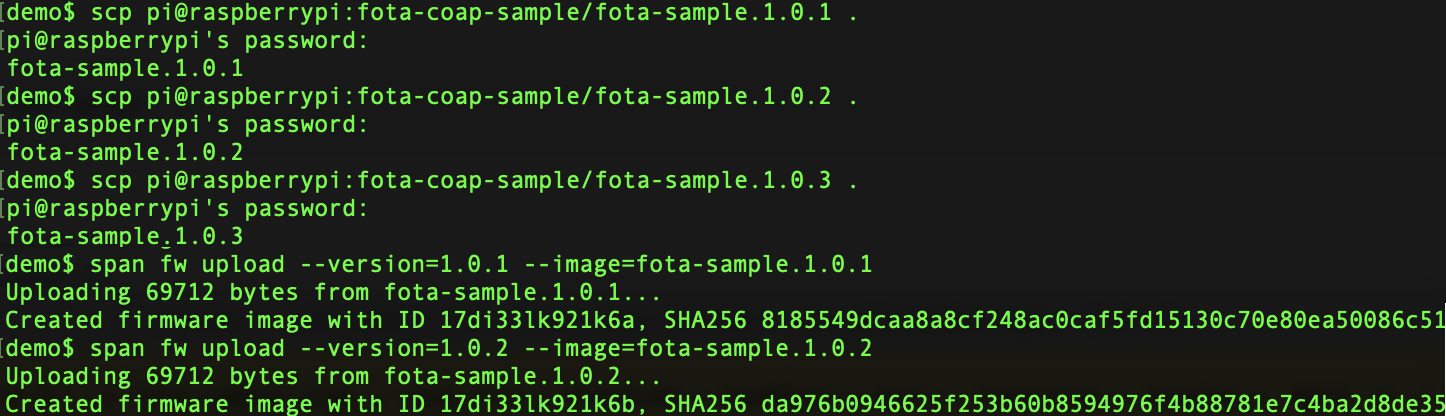
Upload the new version to Span:
span fw upload --image=fota-sample.1.0.1 --version=1.0.1
You can use scp to get the firmware images from the Raspberry Pi:
Assign the new version to the device with
span device update --firmware-version=1.0.1
After a while the device process you launched above should ping back to Span, get a new firmware image and download it. While the firmware is assigned but not downloaded the status should be pending. After the download is completed and the firmware hasn’t reported the new version yet it will be completed. Finally, when the device has reported the new version it will be set to completed:
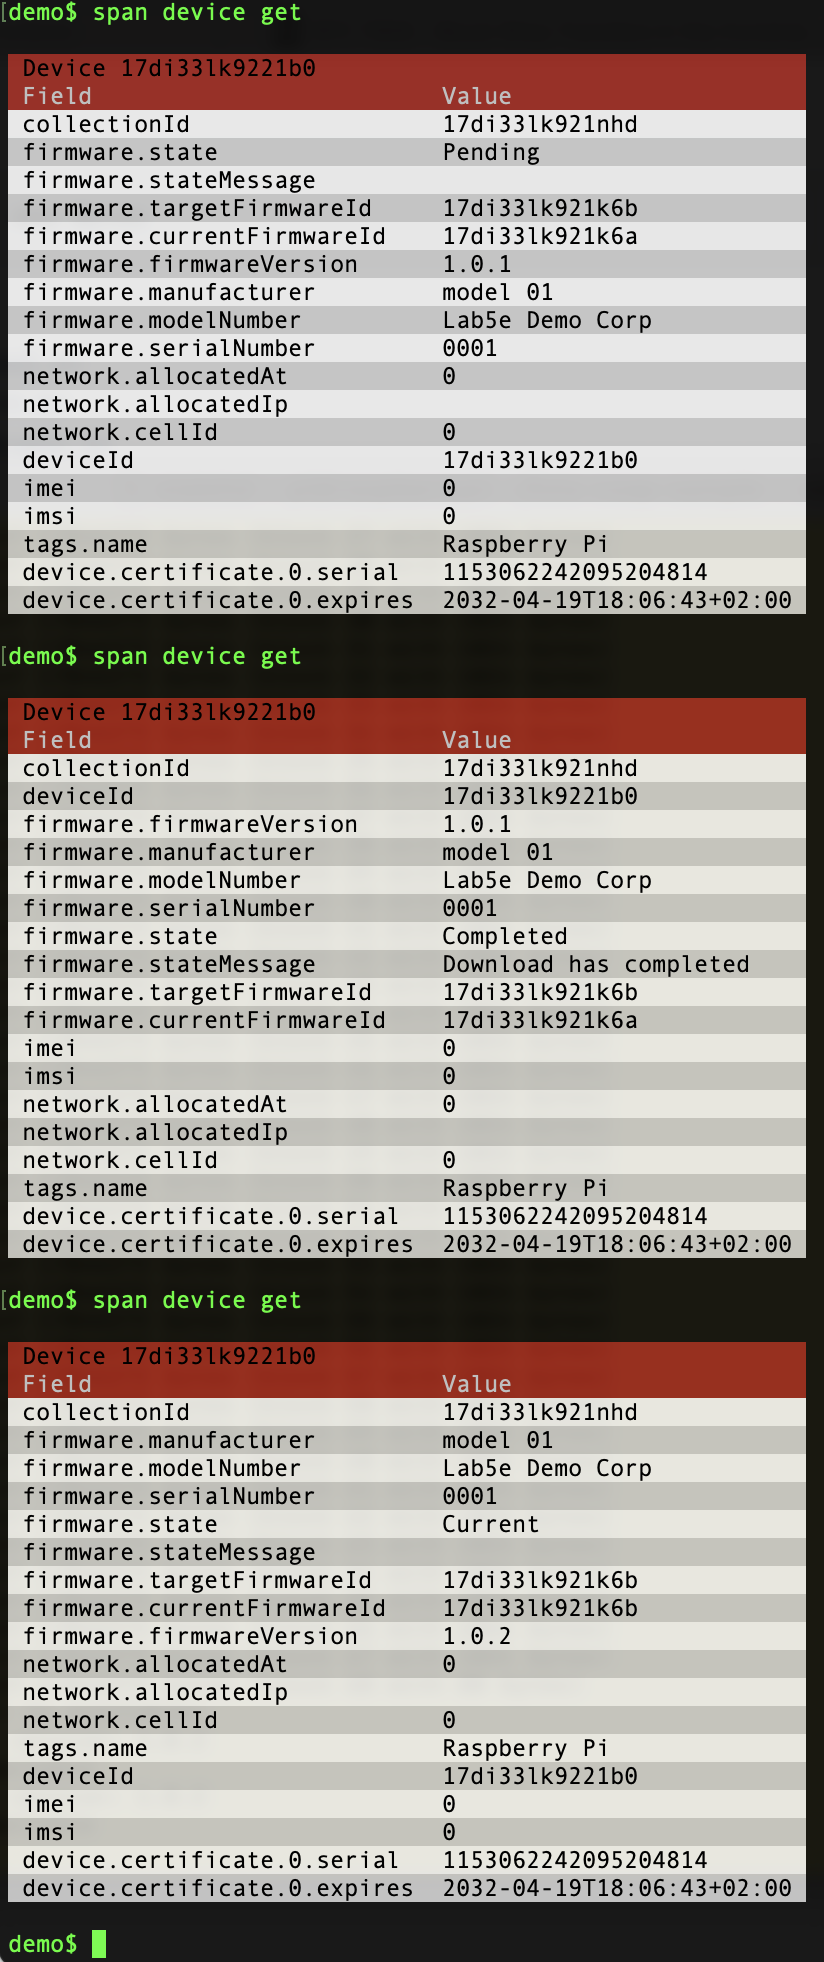
Change the version via span device update a few times to get a feel for the process. Keep an eye out for the activity in the terminal with the device firmware to see what the device does. If you run span fw monitor you can monitor the firmware update progress for the collection.
The nitty gritty details
If you look in the file main.c you’ll get a rough idea on how the code is structured. First off the CoAP library is set up (CERT_FILE and PEM_FILE are the file names for the certificate and private key):
coap_state_t state;

if (!coap_init(&state, CERT_FILE, KEY_FILE)) {
  printf("Could not init CoAP library\n");
  exit(1);
}
Next the upgrade callback is set up and a version report is sent. This will be called if there is a new version available:
fota_report_t report = {
    .manufacturer = (uint8_t *)"Lab5e Demo Corp",
    .model = (uint8_t *)"model 01",
    .serial = (uint8_t *)"0001",
    .version = (uint8_t *)version,
};

coap_set_upgrade_handler(upgrade_cb);

if (!coap_send_report(&state, &report)) {
  printf("Error sending report to server\n");
  exit(3);
}
Finally the main method waits until all CoAP exchanges are completed. Since the download is started within the callback to the upgrade handler it will wait until any pending downloads have completed:
coap_wait_for_exchange(&state);

coap_shutdown(&state);
The upgrade handler function is quite straightforward and just starts the firmware download:
void upgrade_cb(fota_response_t *resp) {
  if (!resp->has_new_version) {
    printf("No new version available\n");
    return;
  }

  coap_download_firmware((const char *)resp->hostname,
                         resp->port,
                         (const char *)resp->path,
                         download_block_cb, CERT_FILE,
                         KEY_FILE);
}
The download callback is equally simple – this just erases the file when block 0 is received (ie the first block) and writes each subsequent block to the image file:
bool download_block_cb(int block_num,
                       uint8_t *buf, size_t len,
                       uint32_t max_size) {
  if (block_num != (last_block + 1)) {
    return false;
  }
  if (downloaded_bytes == 0) {
    struct stat stattmp;
    if (stat(IMAGE_FILE, &stattmp) != -1) {
      unlink(IMAGE_FILE);
    }
  }
  downloaded_bytes += len;
  last_block = block_num;

  int fd = open(IMAGE_FILE, O_CREAT | O_WRONLY | O_APPEND,
                IMAGE_FILE_MODE);
  write(fd, buf, len);
  close(fd);

  if (downloaded_bytes == max_size) {
    downloaded_bytes = 0;
    last_block = -1;
  }
  return true;
}
Good luck!