I decided to split this post into three parts.
Part 1 demonstrates how to use the feather as a simple LTE modem that can send messages to our Span service.
Part 2 demonstrates how to use the Nordic Semiconductor modem library for sending messages to Span and, also how to use the Feather together with a CozIR-LP3 CO2 sensor (real data is always way more interesting than synthetic demo data).
Part 3 demonstrates how to retrieve sensor data from Span via a simple Go-client.
Getting connected
If you are working on anything IoT-related, the first thing you will need is connectivity.
For anything even moderately distributed that also has to run on batteries, this translates to incorporating hardware that enables you to send and receive messages using low-power radio access technologies like LTE-M or NB-IoT.
Since these are mobile network technologies, you will also need a SIM card and subscription.
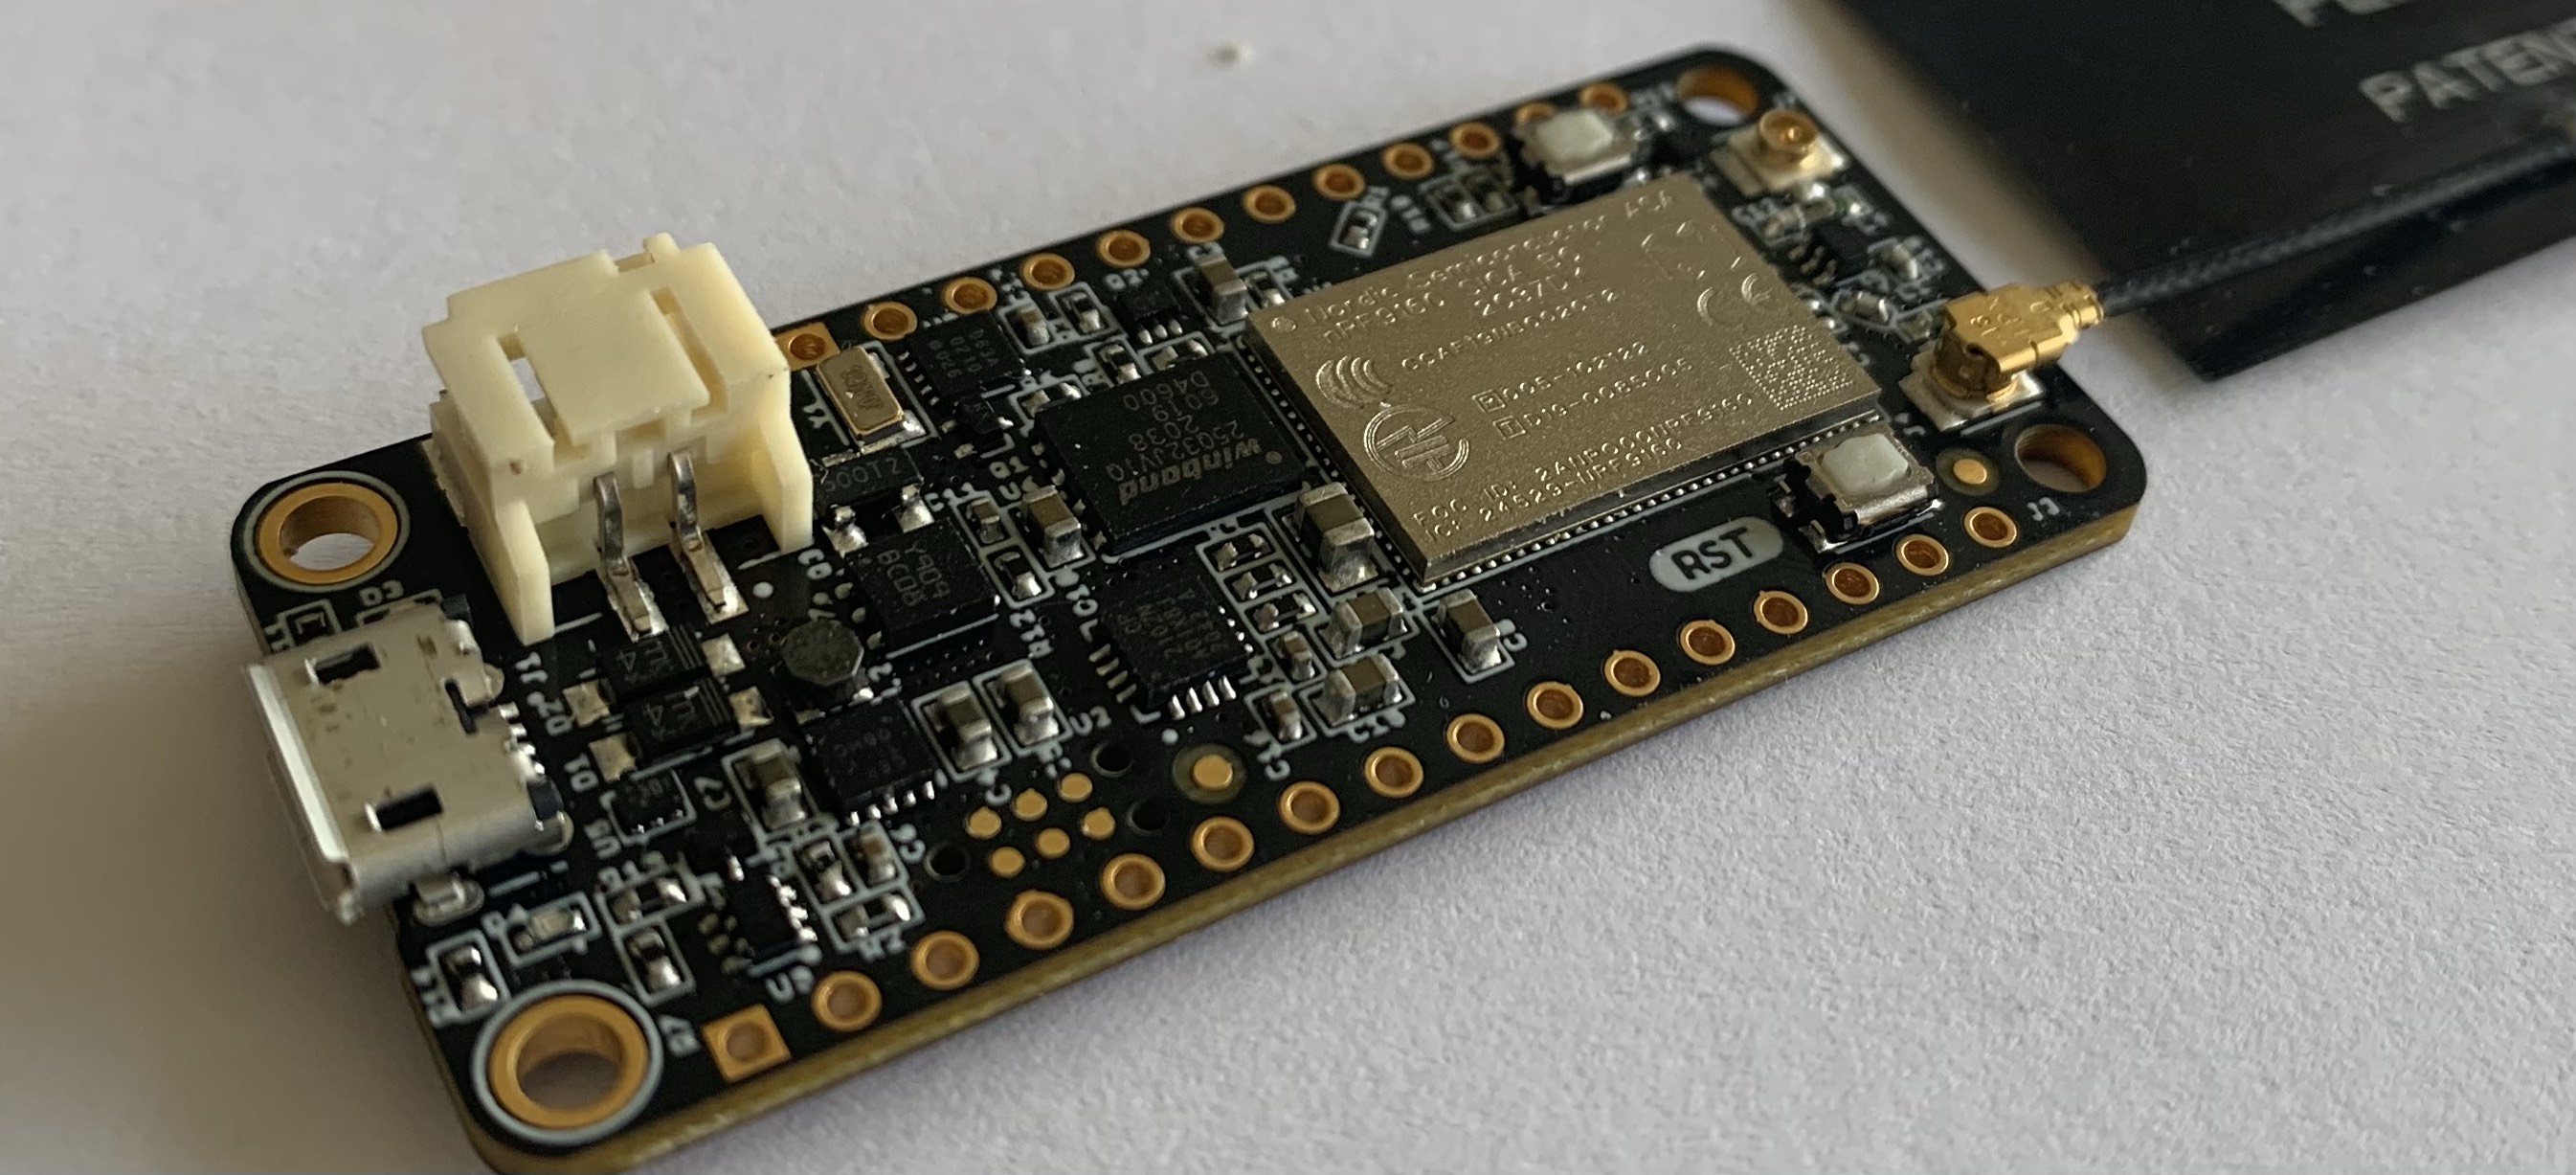
Jared Wolff has designed a really nice and small IoT development board, namely the nRF9160 Feather. It measures 21x53mm in size without the antennas and should be easy to incorporate in any IoT prototype.
First things first
Our main product is the Span service that lets you manage your IoT devices, provides storage and also offers outputs via HTTP webhook, MQTT, IFTTT, or UDP. You can also stream data via web sockets.
Our APN is mda.lab5e. This is currently available via Telenor subscriptions, but can be used globally since LTE-M roaming is supported.
To make the Feather communicate with our service we will use a Telenor SIM card instead of the Hologram SIM that is bundled with the device and configure the Feather accordingly.
Let’s give it a spin
I jumped straight to the documentation page for Windows SDK Setup and followed the instructions there (Mac and Linux is also supported :)). I already had nRF Connect for Desktop and the toolchain manager installed, so all I had to do was to download the correct toolchain and update the remotes and projects sections in the west.yml file according to the documentation. In addition to this, I downloaded the custom version of newtmgr. Links and installation instructions can be found on the following pages: Windows version, Mac version, Linux version.
Firmware
I then opened a command prompt from the Toolchain Manager and navigated to
ncs\v1.5.0\nrf\applications\serial_lte_modem
and built the binary with west.
west build -b circuitdojo_feather_nrf9160ns
If your west version is outdated, you can update it with:
pip install west -U
You will be pleased to know that you do not need an external programmer like J-Link or an nRF9160 Development to be able to flash the Feather. All you need is a USB cable and the following two commands:
newtmgr conn add serial type=serial connstring="dev=COM11,baud=1000000"
You will only have to execute this command once. It basically only tells newtmgr at which port your Feather appears and what baud rate the bootloader expects for firmware updates.
In order to put it in bootloader mode, you will have to hold down the two white buttons on either side of the nrf9160 module while power cycling the Feather. A blue LED next to the USB connector will then light up.
Now you can upload the new firmware to the Feather via newtmgr by executing the following command:
newtmgr -c serial image upload serial_lte_modem/build/zephyr/app_update.bin
A progress bar will appear. When it reaches 100% you can power cycle the device in order to boot the new image (or press the reset button).
This may not come as a surprise to you, but The Serial LTE Modem application requires a serial connection. This means UART.
The default configuration in “prj.conf” is to use UART0. This means that we can hook the Feather directly up to a terminal emulator via USB. If you want to communicate with the Feather from another microcontroller, you will want to use UART2 instead (that maps to the RX/TX pins on the board)
Terminals
Any terminal emulator can be used, but since the Serial LTE modem application by default expects <CR><LF> line termination, you may run into terminal emulation issues with default setups.
If you are using Putty, you will have to enable forced echo mode and connect with 115200 baud 8N1. In order to force Putty to play nice with the application, you will have to enter the following “magic” command in Putty, once you have connected:
<ESC>[20h
Yes, yet another great achievement in user interaction design. What a time to be alive!
Or - we can use the LTE Link Monitor. This is available directly from nRF Connect and works right out of the box :)
Registering the Feather in Span

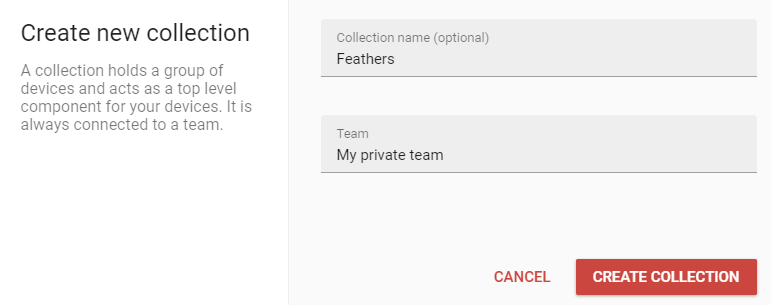
The Span service only allows incoming traffic from registered devices. All we have to do is log in to the Span console with github credentials. We then click on the “Create new collection” link, give the collection a name and select who should have access to the collection.
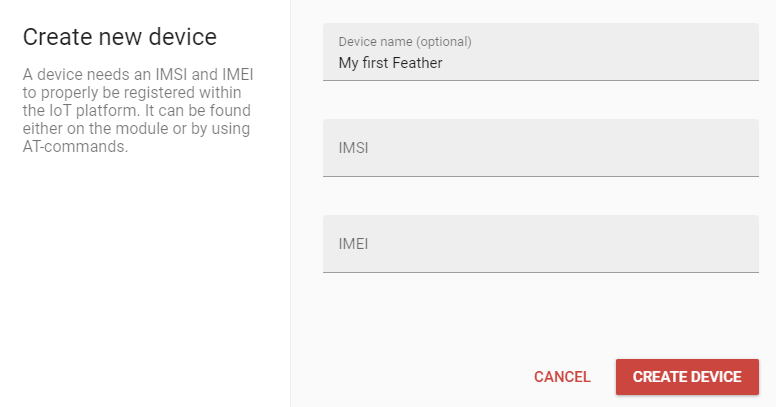
We will then add a device to the collection. Span requires us to provide a name along with the IMSI and IMEI.
In order to retrieve the IMSI and IMEI, we will have to connect a terminal emulator to the Feather via USB. We open the LTE Link Monitor and selects the Feather from the device drop-down menu.
Before we can communicate with the SIM card (for retrieving the IMSI number), we will have to switch the module to full functionality.
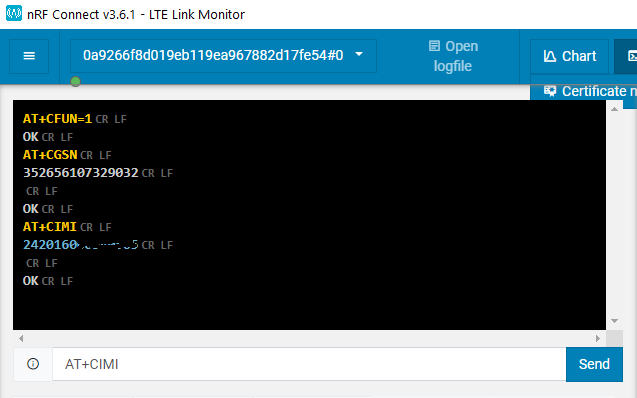
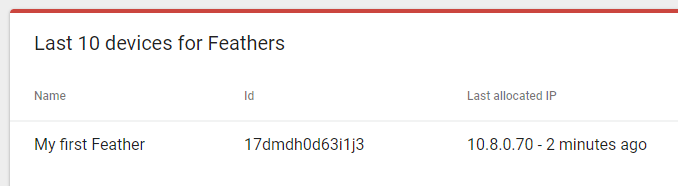
AT+CGSN gives us the IMEI and AT+CIMI gives us the IMSI. We will transfer these numbers to the “Create new device” dialog in Span and press the “Create Device” button in the dialog.
Span will now accept incoming traffic from the device and will also be able to transmit messages back to the device if needed.
But we will also have to configure the Feather so that it knows where to send data.
Configuring the Feather for mda.lab5e
First, we will have to define a PDP (Packet Data Protocol) context, using the AT+CGDCONT command, We will then have to activate our context, using the AT+CGACT command.
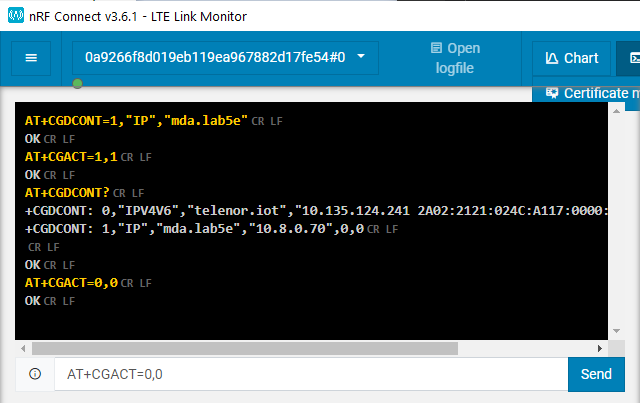
Once the context is activated and the module has registered on the network, we can check to see if the Feather has been allocated an IP address. As we can see, there was already a default context lying in wait. This snuck in via the SIM card once we activated our own context (You can execute the AT+CGDCONT? query command to get a list of defined PDP contexts). We are not going to use context 0, so we will deactivate it.
A few seconds later in the Span console:
Sending our first few bytes
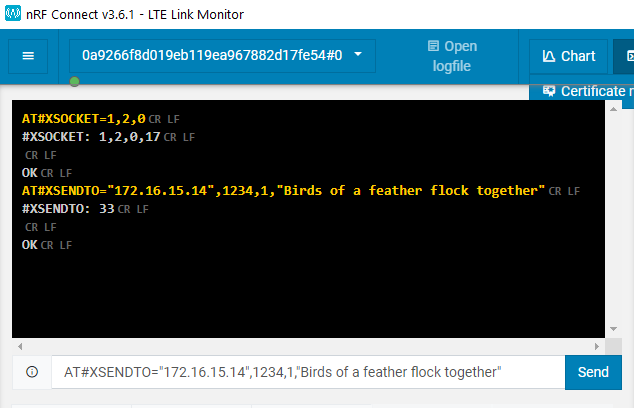
Now, we will instruct the Feather to transmit a message. We are going to use UDP, so we will create a socket using the AT#XSOCKET command. The first argument is the socket operation (1 == open), the second indicates what type of socket (2 == UDP datagram) and the third indicates what type of service we are using (0 == client)
Next, we’ll use the AT#XSENDTO command to transmit the data. This requires 4 arguments. The first is the IP address or domain name to send data to. The IPV4 address for Span is 172.16.15.14, so we will use that. Incoming packets are accepted on port 1234. This is the second argument. The third argument is the data type. We’ll use text type since this is more conducive to a readable blog posting. The fourth and final argument is our actual data. Let’s give it a try!
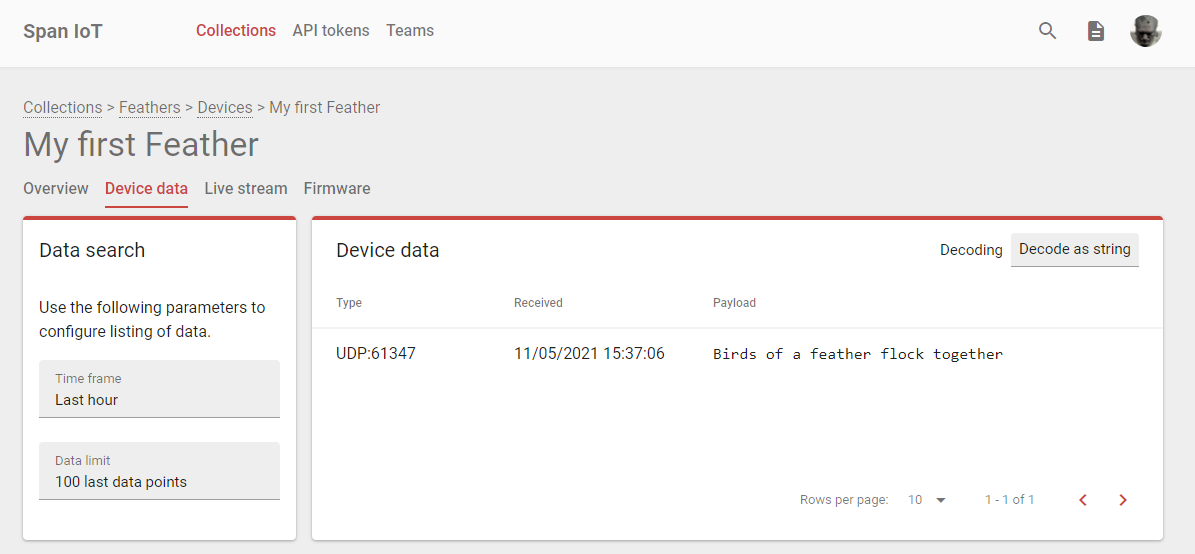
It’s time to check if the message found its way through the mobile network, internal telco network infrastructure, and all the way to the safe IoT haven that is Span.
Next steps
You don’t really want to use the Span management console to process incoming data, but it is nice to be able to validate that initial message without any additional plumbing :)
Natural next steps would be to hook up a sensor to the Feather, so we can make it do something useful.
Update your manifests - Application time!
Open up a command shell from the toolchain manager and navigate to the “nrf” folder. Then open the west.yml file and add the following to the “remotes” section:
    - name: lab5e
      url-base: https://github.com/lab5e
further down in the file, you will find the “projects” section. Add the following:
   - name: feather-CozIR
      path: lab5e/feather/CozIR
      revision: HEAD
      remote: lab5e
Execute
west update
Then, navigate to the folder:
ncs\v.1.5.0\lab5e\feather\CozIR
and build the sample by executing the same west build step as described earlier and flash the binary using newtmgr.
A battery-powered CO2 LTE enabled sensor
I initially wanted to test a really power-efficient sensor for this application, namely the CozIR-Blink from GSS. The power consumption for this sensor is only 26 microwatts per reading. Without power management (which requires an additional 4 mosfets), this is however a one-shot device, since it only performs one sample per power cycle.
Since I’m building a demo device and not a commercial application, I can live with a slightly higher current drain. I, therefore, switched to the CozIR-LP3 instead. This has 3.3mW active power consumption and 3.3 microwatts standby. The pinout is identical to the Blink version.
Rat’s nest FTW
It would be trivial to turn this into a shield for the Feather, but we want to play with our new toy now - not in two weeks :)
In addition to some wiring, we’ll use the following components:
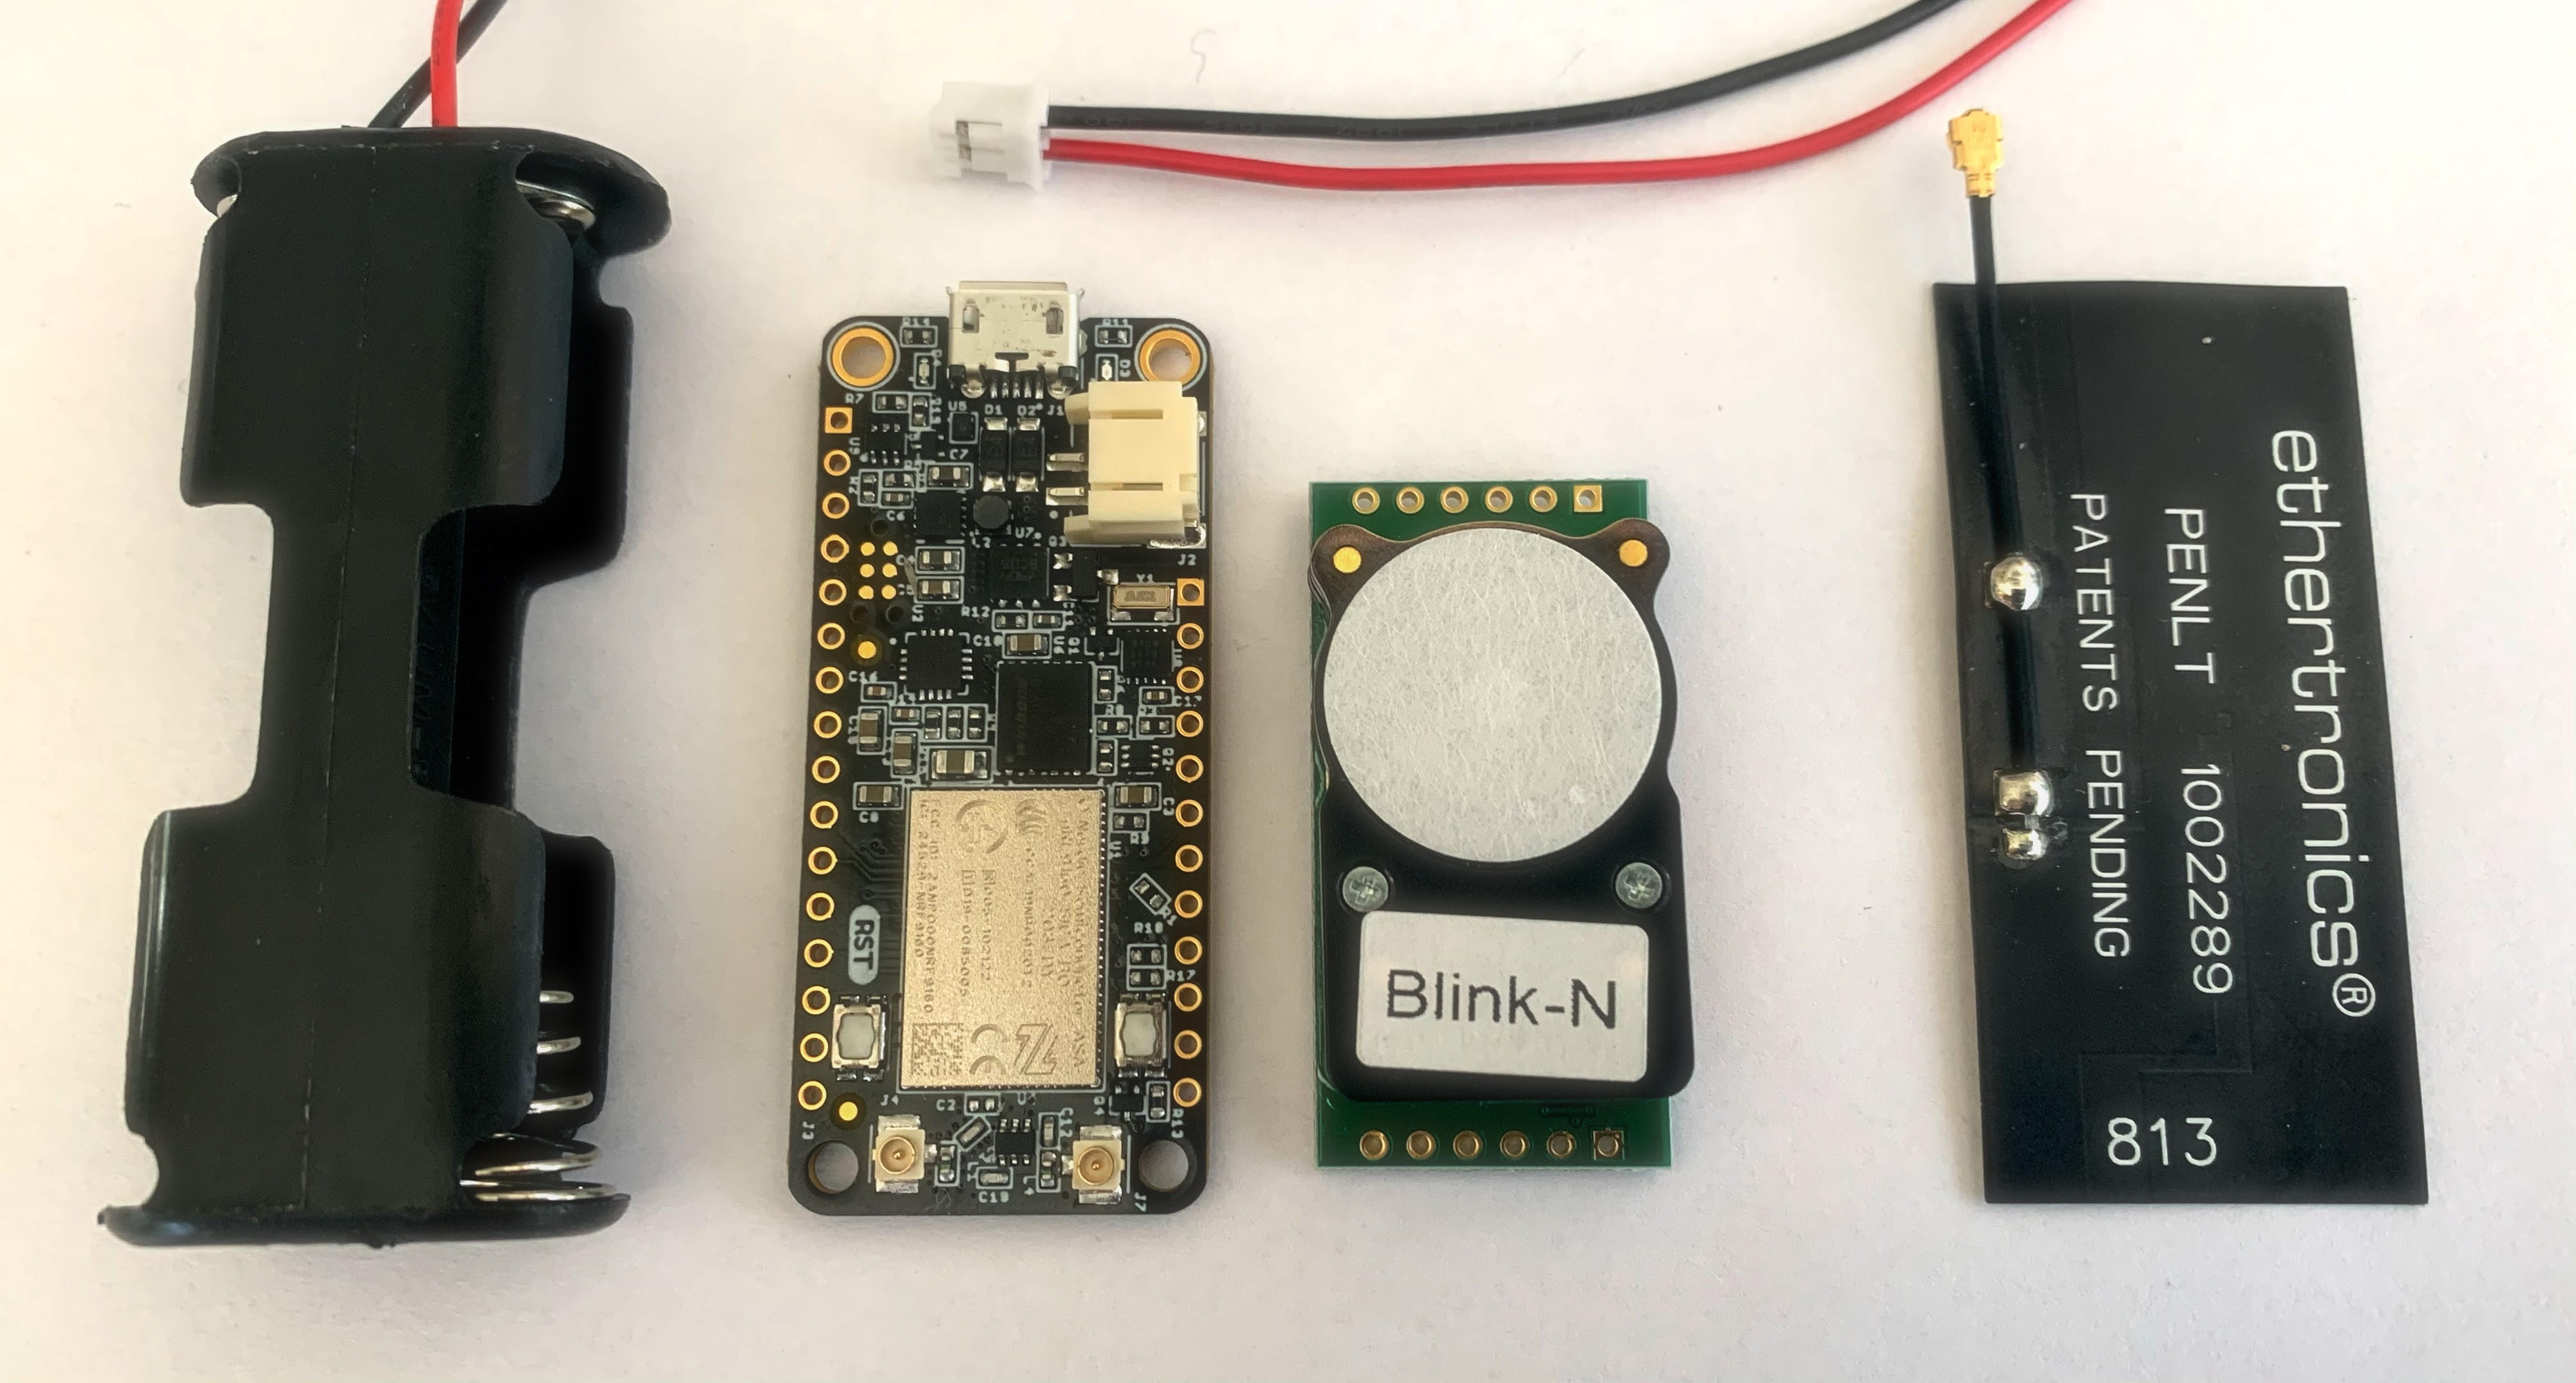
You may have noticed that the power connector mates with the same 2P JST connectors that the BBC Micro:Bit uses. If you source these with leads already connected, it is a really good idea to always check the polarity before hooking up a battery. I sourced mine from Ali Express as “BBC Micro:Bit power leads” and the polarity turns out to be reversed.
Looking at the Feather schematics, I notice that Jared has been kind enough to add 20k SDA and SCL pull-ups. Two fewer components to worry about :)
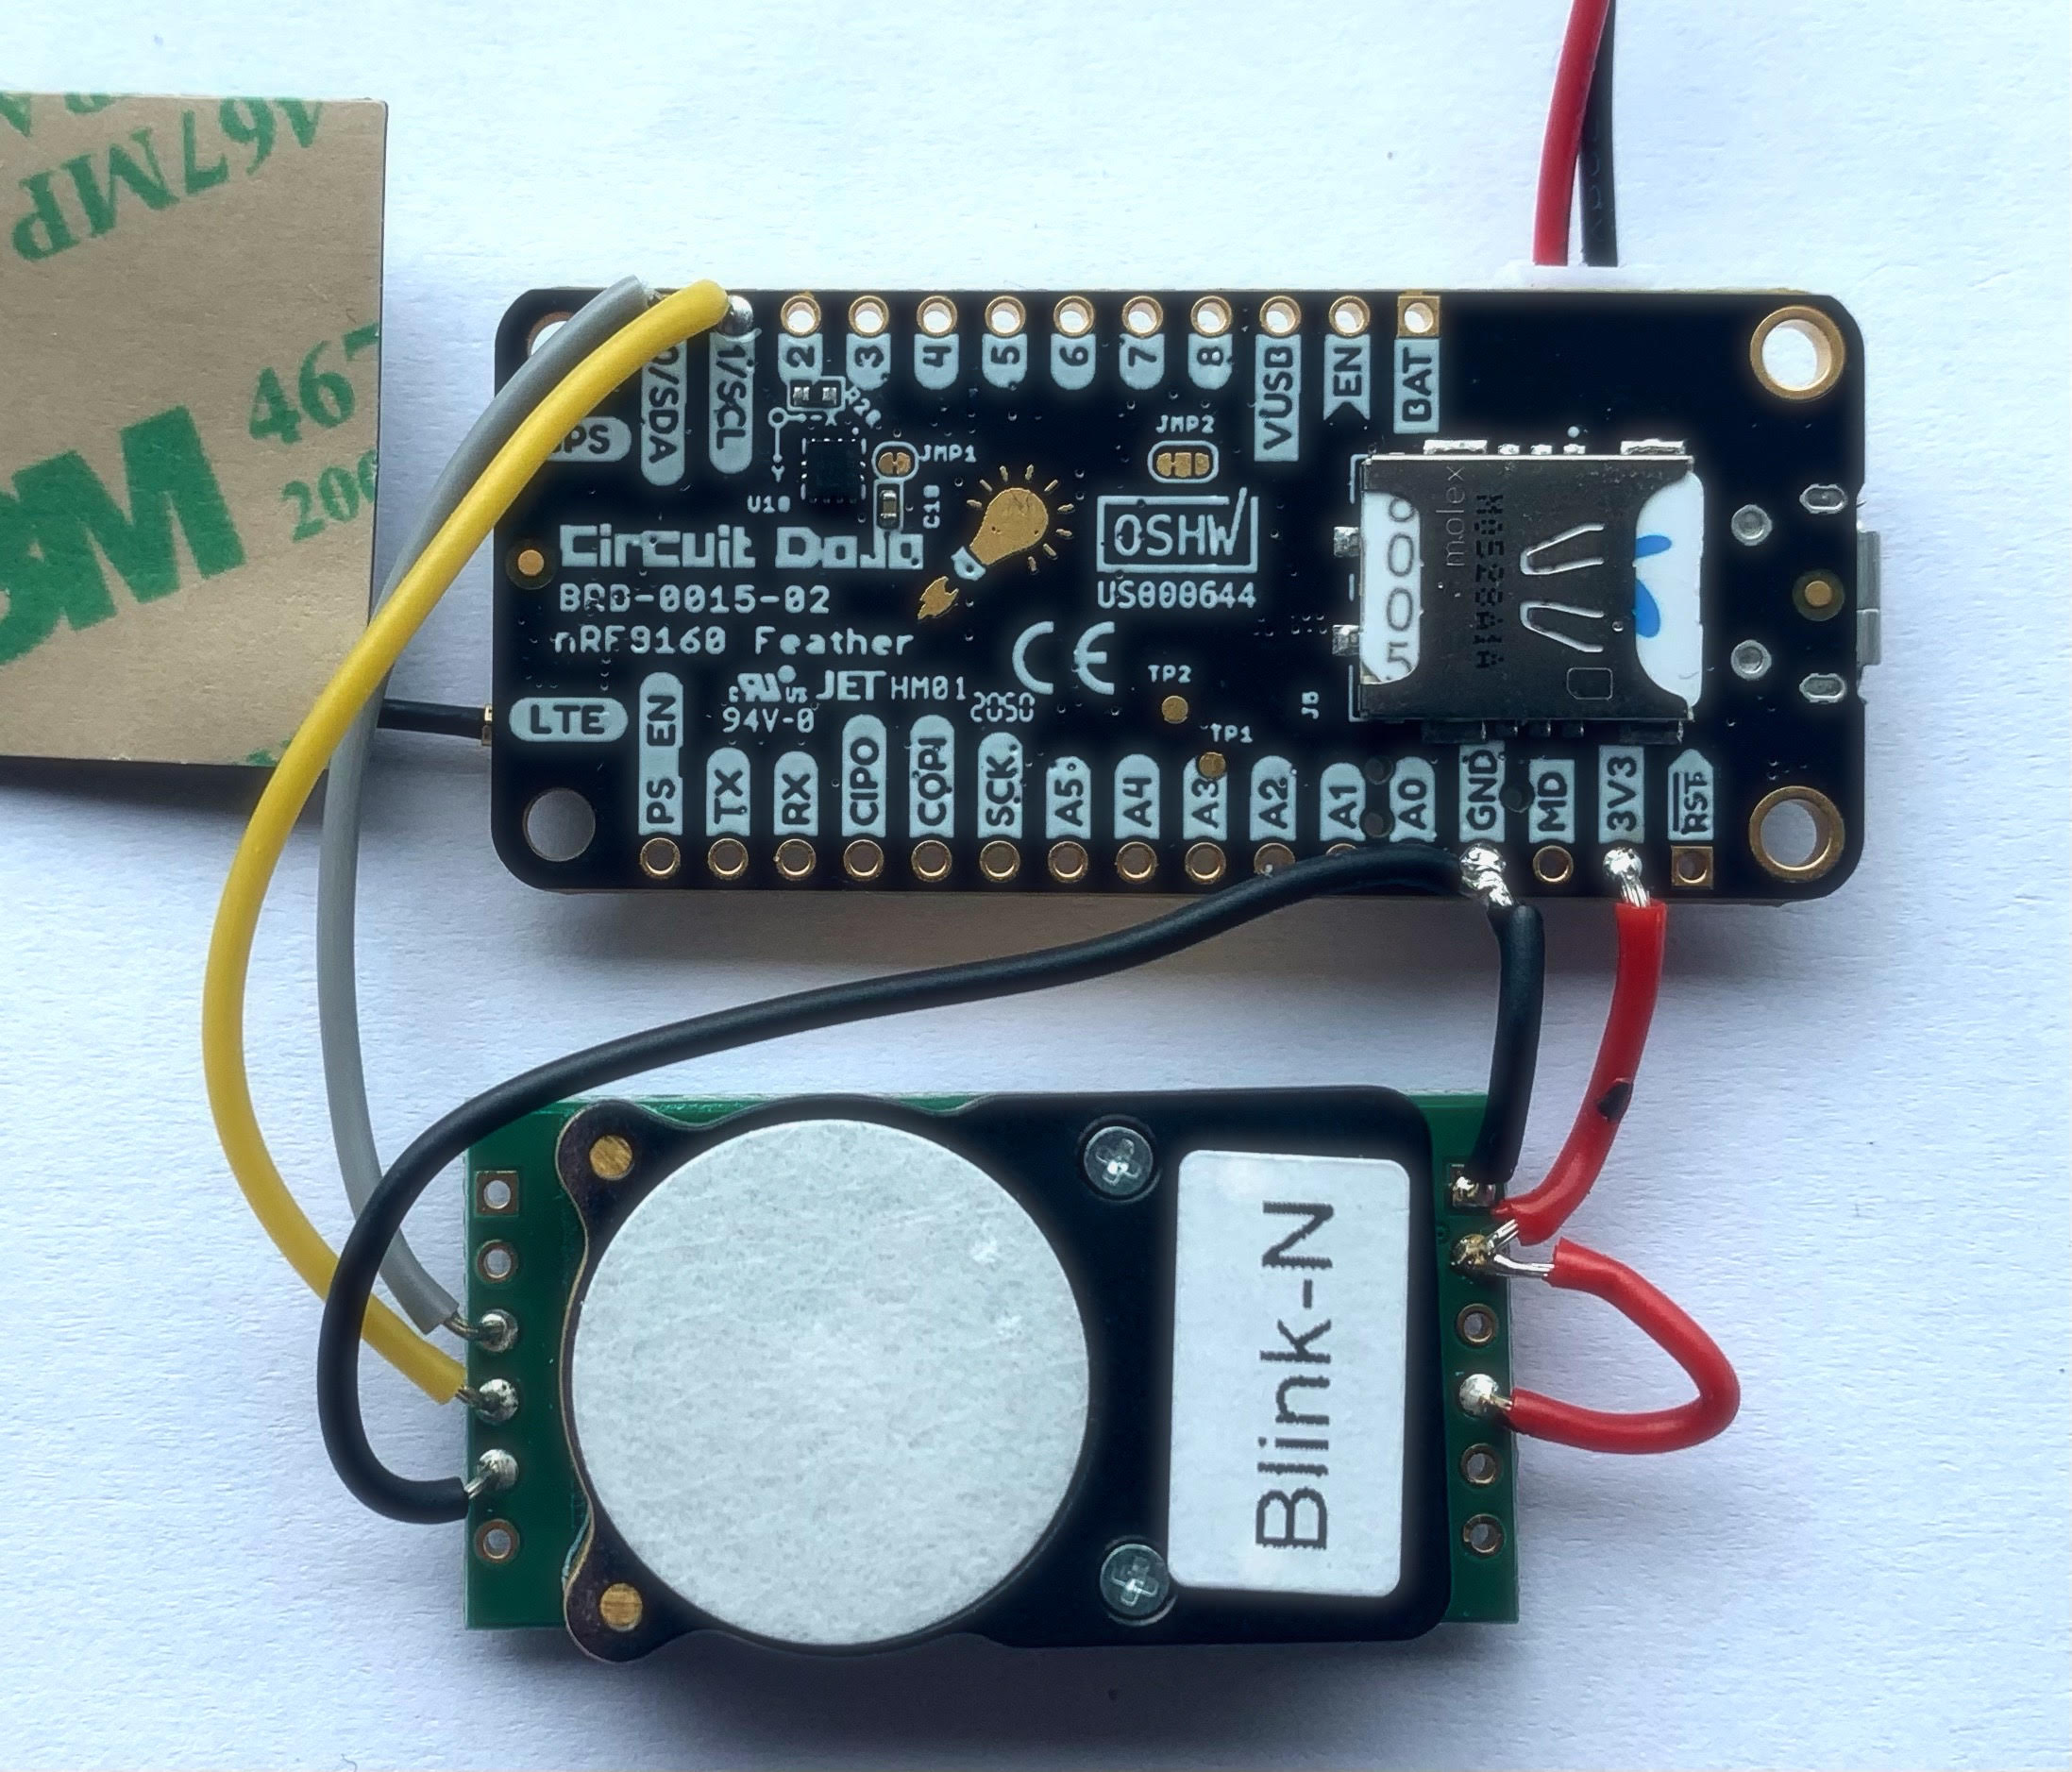
Solderin’ time
The connections are as follows:
| Feather | CozIR |
|---|---|
| 3V3 | VDD |
| 3V3 | PWR_ON |
| GND | GND |
| SDA | SDA |
| SCL | SCL |
| GND | I2C_Enable |
Codin’ time
You can take a look at the code in the CozIR-folder or on GitHub if you are curious about the implementation details. The firmware relies on the LTE Link controller and Modem libraries and also on the socket offloading functionality that is enabled by default.
CO2 samples are retrieved from the sensor as 16-bit values.
int read_CozIR_CO2_PPM(uint16_t * ppm)
{
    uint8_t co2_ppm[2] = {0,0};
    int ret = i2c_burst_read(i2c_device, COZIR_I2C_ADDRESS, COZIR_CO2_LEVEL_REGISTER, &co2_ppm[0], 2);
    if (ret == 0)
    {
        *ppm = co2_ppm[0] << 8 | co2_ppm[1];
    }
    else
    {
        printk("i2c_burst_read failed with error: %d\n", ret);
    }
    return ret;
}
For the sake of clarity, I encode the data in a string format and then send them to Span using the socket abstraction in the modem library. The Span public IP is 172.16.15.14 and it will accept incoming UDP on port 1234
bool send_message(const char *message)
{
	int sock = socket(AF_INET, SOCK_DGRAM, IPPROTO_UDP);
	if (sock < 0)
	{
		printk("Error opening socket: %d\n", errno);
		return false;
	}

	static struct sockaddr_in remote_addr =
	{
		sin_family: AF_INET,
		sin_port:   htons(1234),
	};
	net_addr_pton(AF_INET, "172.16.15.14", &remote_addr.sin_addr);

	if (sendto(sock, message, strlen(message), 0, (struct sockaddr *)&remote_addr, sizeof(remote_addr)) < 0)
	{
		printk("Error sending: %d\n", errno);
		close(sock);
		return false;
	}

	close(sock);
	return true;
}
Build & Flash
From the CozIR folder:
west build -b circuitdojo_feather_nrf9160ns -p
newtmgr -c serial image upload build/zephyr/app_update.bin
Meanwhile - Somewhere else on the internet:
You can easily access cached or live data from your sensors in the field from a simple client running somewhere else on the internet - written in your favorite language. I decided to use our Go client example as a starting point. This comes with several usage examples. I downloaded the client code, installed the dependencies listed in the README file, and then opened the data example in Visual Studio Code.
Since data is transmitted in base 64-format, I had to additionally import “encoding/base64” and change the following code block
	for _, data := range items.Data {
		fmt.Println("Device ID: ", data.Device.DeviceId, " Payload: ", data.Payload, " Transport: ", data.Transport)
	}
to
for _, data := range items.Data {
		decoded,_ := base64.StdEncoding.DecodeString(data.Payload)
		fmt.Println("Device ID: ", data.Device.DeviceId, " Payload: ", string(decoded), " Transport: ", data.Transport)
	}
in order to get the data in human-readable format.
The data example expects two arguments. These are:
go run main.go -collection-id <Span collection id> -token <Span API token>
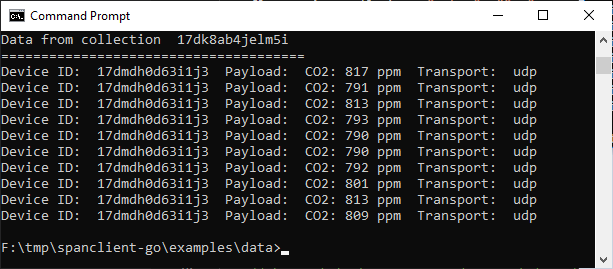
My home office is located in the basement. Hence, the rather high CO2 readings. One nice thing about the CozIR sensors is also that you can do a reference measurement with a calibrated (trusted) instrument and upload a “known CO2 concentration” (register 0x14) to the CozIR via I2C. It’s nice to know that this is a possibility, but I’ll leave that for a later experiment.
Anyways, I believe this qualifies as IoT :)
Happy hacking!