
About DTLS
Datagram Transport Layer Security (DTLS) is - in short - “TLS for UDP”. The protocol is based on TLS and encrypts data in flight.
Getting everything set up
It’s quite easy to get a Raspberry Pi up and running nowadays. I’m using a Raspberry Pi Zero so the majority
of Raspberry Pis will work for this. The Raspberry Pi Imager gets a
new image ready in a few minutes and since I can’t be bothered with digging out yet another HDMI cable I’m
adding an empty /boot/ssh file, a /boot/userconf.txt file and the /boot/wpa_supplicant.conf file while
the image is mounted.
Plug in the SD card, connect USB power and since mDNS via Avahi is turned on by default you should be able
to run ssh pi@raspberry.local a minute or two later.
Change the default password (via passwd) and set the hostname via sudo hostnamectl and editing the
/etc/avahi/avahi-daemon.conf file to get the appropriate mDNS name. To make my life a little bit easier
I’m adding my ssh public key into ~/.ssh/authorized_keys so I won’t have to bother with passwords anymore.
Start by cloning the repository from Git:
git clone https://github.com/lab5e/dtls-mbedtls-sample
Then install the mbedtls development headers:
sudo apt-get install libmbedtls-dev gcc
..and you’re set. Build it by running cd ~/dtls-mbedtls-sample && make.
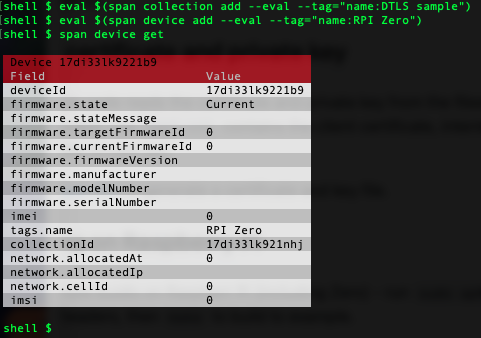
To run the sample you’ll have to get hold of a client certificate for the device. Run the Span CLI to create a new collection and device:
eval $(span collection add --eval --tag="name:DTLS sample")
eval $(span device add --eval --tag="name:RPI Zero")
(Note that I’m using eval $(...) to set an environment variable to the collection ID and device ID here. This is just to save some typing later. You can call the Span CLI without the --eval parameter but you’ll have to specify the collection ID and device ID every time you run the Span CLI)
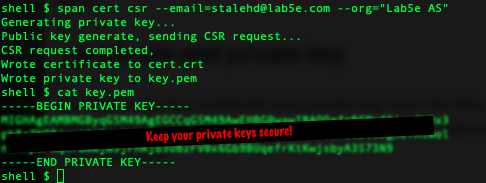
Next create a certificate for the device with the Span CLI.
span cert csr
This should leave you with two new files in the current directory – cert.crt with the client certificate and key.pem with the private key.
You could use the cert create command but a certificate signing request is the best alternative since the private key won’t leave your computer at any point in time.
If you’re running the Span CLI on a different computer copy the two via scp:
scp cert.crt pi@raspberry.local:dtls-mbedtls-sample/
scp key.pem pi@raspberry.local:dtls-mbedtls-sample/
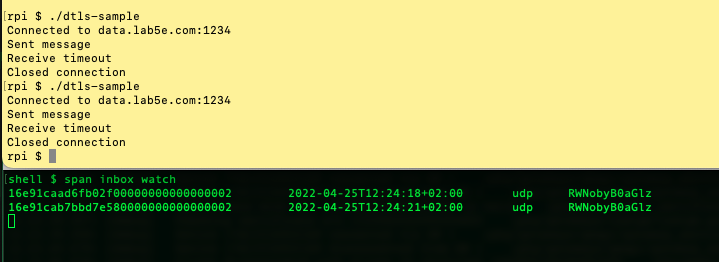
SSH into the Pi Zero and when you run the sample you should see something like this:

Either go to the Span Console to see the payload or use the Span CLI:
span inbox list

Downloading messages from the server
You can enqueue messages to the client with the outbox command. The next time the device sends a payload to the server it will get the enqueued message from the server.
Start by adding a new message via the Span CLI:
span outbox add --format=text Hello there
List the messages by running the list command. The status of the message is set to pending:
span outbox list

The next time you run the sample you will see an output like this:

If you run the span outbox list command again the message has changed state to sent:
 Play around with the
 inbox watch and outbox watch to see messages in real-time from the device.
The implementation
mbedtls is a very popular DTLS/TLS library for embedded systems but works equally fine on f.e. Raspberry Pi and Linux.
Initialise mbedtls
There’s quite a few structs and configuration options that must be set but most of these are boilerplate code.
The mbedtls library wraps the usual sockets so start by initialising the socket:
int ret = 0;
mbedtls_net_context fd;

mbedtls_net_init(&fd);
Next, initialise the SSL configuration to be a client (MBEDTLS_SSL_IS_CLIENT), use DTLS (MBEDTLS_SSL_TRANSPORT_DATAGRAM)
and to use the defaults otherwise (MBEDTLS_SSL_PRESET_DEFAULT):
mbedtls_ssl_config conf;
mbedtls_ssl_config_init(&conf);
if ((ret = mbedtls_ssl_config_defaults(&conf, MBEDTLS_SSL_IS_CLIENT,
                                        MBEDTLS_SSL_TRANSPORT_DATAGRAM,
                                        MBEDTLS_SSL_PRESET_DEFAULT)) != 0) {
  exit(1);
}
The the random number generator for the crypto library must be configured:
mbedtls_entropy_context entropy;
mbedtls_ctr_drbg_context ctr_drbg;

mbedtls_entropy_init(&entropy);
mbedtls_ctr_drbg_init(&ctr_drbg);

const char *pers = "dtls_client";

if ((ret = mbedtls_ctr_drbg_seed(&ctr_drbg, mbedtls_entropy_func,
                                  &entropy, (const unsigned char *)pers,
                                  strlen(pers))) != 0) {
  exit(1);
}
mbedtls_ssl_conf_rng(&conf, mbedtls_ctr_drbg_random, &ctr_drbg);
Next initialize the SSL structure. This will be associated with the configuration later:
mbedtls_ssl_context ssl;

mbedtls_ssl_init(&ssl);
To make a successful connection you’ll need a certificate, a certificate chain with root certificates and a (private) key for your certificate. This will read the certificates from a single file, use the first one as the client certificate and the remainders as the CA chain, ie the root certificates. This reads the files directly from the file system (“certs.crt” and “key.pem”) but for embedded systems you might have to embed the certificates in the build or read them from flash first:
mbedtls_x509_crt all_certs;

mbedtls_x509_crt_init(&all_certs);

if (mbedtls_x509_crt_parse_file(&all_certs, "certs.crt") < 0) {
  exit(2);
}

mbedtls_x509_crt *client_cert = &all_certs;
mbedtls_x509_crt *ca_chain = all_certs.next;

mbedtls_pk_init(&rivate_key);
if (mbedtls_pk_parse_keyfile(&private_key, "key.pem", NULL) < 0)  {
  exit(3);
}

mbedtls_ssl_conf_authmode(&conf, MBEDTLS_SSL_VERIFY_REQUIRED);
mbedtls_ssl_conf_ca_chain(&conf, ca_chain, NULL);
mbedtls_ssl_conf_read_timeout(&conf, READ_TIMEOUT_MS);
mbedtls_ssl_conf_own_cert(&conf, client_cert, &private_key);
mbedtls_ssl_conf_cert_req_ca_list(&conf, MBEDTLS_SSL_CERT_REQ_CA_LIST_ENABLED);
Once the certificates are loaded you can associate the configuration with the SSL context:
if (mbedtls_ssl_setup(&ssl, &conf) != 0) {
  exit(4);
}
The SSL context is now configured and ready to connect to the server.
Connecting
Connecting is relatively straightforward - just call mbed_net_connect:
const char *server_addr = "data.lab5e.com";
const char *port = "1234";

if (mbedtls_net_connect(&fd, server_addr, port, MBEDTLS_NET_PROTO_UDP) != 0) {
  exit(5);
};
The send and receive methods for DTLS require some custom logic but you can set up the default
send and receive callbacks with mbedtls_ssl_set_bio (“bio” is short for Basic IO):
mbedtls_ssl_set_bio(&ssl, &fd, mbedtls_net_send,
                    mbedtls_net_recv, mbedtls_net_recv_timeout);

mbedtls_timing_delay_context timer;
mbedtls_ssl_set_timer_cb(&ssl, &timer, mbedtls_timing_set_delay,
                         mbedtls_timing_get_delay);
Next up is the handshake. This loops until the handshake is processed. If the handshake call fails it is most likely incorrect certificates:
do {
  ret = mbedtls_ssl_handshake(&ssl);
} while (ret == MBEDTLS_ERR_SSL_WANT_READ ||
         ret == MBEDTLS_ERR_SSL_WANT_WRITE);

if (ret != 0) {
  exit(6);
}
Next up you must check the result of the handshake, ie verify the result. The returned flags should not be set:
uint32_t flags = 0;

if ((flags = mbedtls_ssl_get_verify_result(&ssl)) != 0) {
  char vrfy_buf[2048];
  mbedtls_x509_crt_verify_info(vrfy_buf, sizeof(vrfy_buf), "  ! ", flags);
  printf("Failed certificate verification: %s\n", vrfy_buf);
  exit(7);
}
By this time the socket is connected and ready to send and receive data.
Sending and receiving data
Sending and receiving data is basically the same do…while loop as for the handshake. Sending is
const char *buf = "The message";
const size_t len = strlen(buf);
do {
  ret = mbedtls_ssl_write(&ssl, buf, &len);
} while (ret == MBEDTLS_ERR_SSL_WANT_READ ||
         ret == MBEDTLS_ERR_SSL_WANT_WRITE);
if (ret < 0) {
  exit(8);
}
Receiving data is
char buf[256];
const size_t len = sizeof(buf);

do {
  ret = mbedtls_ssl_read(&ssl, buf, len);
} while (ret == MBEDTLS_ERR_SSL_WANT_READ ||
         ret == MBEDTLS_ERR_SSL_WANT_WRITE);
If the return code is negative after the read the return code indicates the error. If it is set to
MBEDTLS_ERR_SSL_TIMEOUT it is a regular timeout, ie there’s no data waiting from the server.
MBEDTLS_ERR_SSL_PEER_CLOSE_NOTIFY is returned when the peer has (gracefully) closed the connection.
Any other error code can be extracted with the mbedtls_strerror function.
Disconnecting
Unsurprisingly the close call is another do…while loop:
do {
  ret = mbedtls_ssl_close_notify(&state->ssl);
} while (ret == MBEDTLS_ERR_SSL_WANT_WRITE);
Finally, when cleaning you release the allocated structs:
mbedtls_net_free(&fd);
mbedtls_x509_crt_free(&all_certs);
mbedtls_ssl_free(&ssl);
mbedtls_ssl_config_free(&conf);
mbedtls_ctr_drbg_free(&ctr_drbg);
mbedtls_entropy_free(&entropy);
mbedtls_pk_free(&private_key);
As you’d probably gathered from now - there’s a lot of boilerplate. In the sample project all the boilerplate is put into four functions that uses a state type to keep track of everything:
dtls_state_t dtls;

if (!dtls_connect(&dtls, HOST, PORT)) {
  dtls_close(&dtls);
  return 2;
}

if (!dtls_send(&dtls, MESSAGE, strlen(MESSAGE))) {
  dtls_close(&dtls);
  return 3;
}

char receive_buf[1024];
size_t read_bytes = dtls_receive(&dtls, receive_buf, sizeof(receive_buf) - 1);
if (read_bytes > 0) {
  printf("received %d bytes from server (%s)\n", read_bytes, receive_buf);
}

dtls_close(&dtls);
Note thtat the dtls_connect function is quite expensive so if you plan to send and receive several packets it’s worthwhile keeping the state up.