
About CoAP
If you aren’t familiar with CoAP here’s a quick feature list:
- Lightweight protocol
- Roughly based on the HTTP protocol
- Suitable for UDP (and DTLS) transports
The protocol itself is quite lightweight and you can fit the header in a few bytes. At first glance the nomenclature is quite familiar if you’ve dug into HTTP. There’s requests, responses, error codes and content types. The response codes are more or less identical to HTTP but the notation is slightly different. In HTTP every status code is three-digit integer but in CoAP it’s split into two parts so rather than 200 OK you’ll get a 2.00 response code. Ditto for 404 NOT FOUND in HTTP - the CoAP equivalent is 4.04. There’s no redirects or continue response in CoAP so you’ll only encounter 2.xx, 4.xx and 5.xx response codes. Sadly there’s no 418 I’m a teapot either.
A subset of the verbs in HTTP is also used so you’ll see GET, POST and DELETE in CoAP but no HEADER, OPTIONS or TRACE verbs.
A request can be confirmable or non-confirmable. A confirmable request gets a response from the server (or client).
Most major embedded frameworks have support for CoAP but implementing a small subset of the protocol is quite straightforward.
You might se “blockwise transfers” mentioned and it’s the CoAP way of transferring large files but as a rule of thumb you want to keep the payloads reasonable small so that a single packet fits into the MTU of the network. A good rule of thumb is to keep the packets under 256 bytes for both headers and payload.
You can run CoAP on top of any transport but it’s commonly used on top of UDP and DTLS.
CoAP is specified in RFC 7252.
Using libcoap
Libcoap is a library that is used by the ESP-IDF framework but works equally well standalone. Libcoap wraps the mbedtls library for DTLS support.
Setting up
Start by initialising the library with a call to coap_startup and optionally set the log levels. Increase the log levels if are troubleshooting but LOG_NOTICE should be fine for normal operations.
coap_startup();
coap_dtls_set_log_level(LOG_NOTICE);
coap_set_log_level(LOG_NOTICE);
Next, resolve the addresses you are going to use. You’ll have to resolve both the server and the local address. I’m using a helper function named resolve_address that will resolve a string to a struct sockaddr:
coap_address_t server;
coap_address_init(&server);
if (!resolve_address("data.lab5e.com", &server.addr.sa)) {
  exit(1);
}
server.addr.sin.sin_port = htons(5684);

coap_address_t local;
coap_address_init(&local);
if (!resolve_address("0.0.0.0", &local.addr.sa)) {
  exit(2);
}
Once the addresses are resolved you’ll need a context for the CoAP client. This is a simple one-liner:
coap_context_t *ctx = coap_new_context(NULL);
if (!ctx) {
  exit(3);
}
coap_context_set_keepalive(ctx, 10);
Next the client certificate must be configured. This will read the certificate chain from cert.crt and the private key from key.pem:
coap_dtls_pki_t dtls;
memset(&dtls, 0, sizeof(dtls));
dtls.version = COAP_DTLS_PKI_SETUP_VERSION;

dtls.verify_peer_cert = 1;        // Verify peer certificate
dtls.require_peer_cert = 1;       // Require a server certificate
dtls.allow_self_signed = 1;       // Allow self signed certificate
dtls.allow_expired_certs = 0;     // No expired certificates
dtls.cert_chain_validation = 1;   // Validate the chain
dtls.check_cert_revocation = 0;   // Check the revocation list
dtls.cert_chain_verify_depth = 2; // Depth of validation.

dtls.pki_key.key_type = COAP_PKI_KEY_PEM;
dtls.pki_key.key.pem.public_cert = "cert.crt";
dtls.pki_key.key.pem.private_key = "key.pem";
dtls.pki_key.key.pem.ca_file = "cert.crt";

coap_session_t *session =
    coap_new_client_session_pki(ctx, &local, &server, COAP_PROTO_DTLS, &dtls);

if (!session) {
  exit(4);
}
Callbacks
This should take care of all the basics. The responses and status updates are handled via callbacks that you must implement. There are two callbacks that you’ll need. The first one is the message handler which is called every time a message is received from the server:
static void message_handler(coap_context_t *ctx, coap_session_t *session,
                            coap_pdu_t *sent, coap_pdu_t *received,
                            const coap_tid_t id) {
  switch (COAP_RESPONSE_CLASS(received->code)) {

  case 4:
    // Server reported a 4.xx error, ie a "not found" response
    break;

  case 5:
    // Server reported a 5.xx error, ie an error server-side
    break;

  case 2:
    // 2.xx is a success, either when POSTing something or GETting something. There might be a payload in the
    // response message that you should read.
    size_t len = 0;
    uint8_t *data = NULL;
    if (coap_get_data(received, &len, &data) == 0) {
      break;
    }
    if (len > 0) {
      char str[512];
      memset(str, 0, sizeof(str));
      strncpy(str, data, sizeof(str) - 1);
      // Process response data
    }

    break;
  default:
    // Some other response code was returnwed.
    break;
  }
}
Next is the NACK handler. This is called when there are other kinds of errors:
void nack_handler(coap_context_t *context, coap_session_t *session,
                  coap_pdu_t *sent, coap_nack_reason_t reason,
                  const coap_tid_t id) {
  switch (reason) {
  case COAP_NACK_TOO_MANY_RETRIES:
    break;
  case COAP_NACK_NOT_DELIVERABLE:
    break;
  case COAP_NACK_RST:
    break;
  case COAP_NACK_TLS_FAILED:
    break;
  default:
    break;
  }
}
In addition there’s a DTLS status handler that can be useful for diagnosing DTLS issues. The sample code includes a handler for this.
Wiring the handlers is just a matter of calling the following functions:
coap_register_response_handler(ctx, message_handler);
coap_register_nack_handler(ctx, nack_handler);
coap_register_event_handler(ctx, event_handler);
Sending a request
To send a request you create a PDU struct, set the type, message ID and appropriate options.
coap_pdu_t *request = coap_new_pdu(session);
if (!request) {
  exit(5);
}

request->type = COAP_MESSAGE_CON;
request->tid = coap_new_message_id(session);
request->code = COAP_REQUEST_POST;

coap_optlist_t *optlist = NULL;

const char *path = "path-for-data";
const char *hostname = "data.lab5e.com";
const char *port = "5684";

coap_insert_optlist(&optlist, coap_new_optlist(COAP_OPTION_URI_PORT,
                                                coap_opt_length(portstr),
                                                coap_opt_value(portstr)));
coap_insert_optlist(&optlist, coap_new_optlist(COAP_OPTION_URI_HOST,
                                                coap_opt_length(hostname),
                                                coap_opt_value(hostname)));
coap_insert_optlist(&optlist, coap_new_optlist(COAP_OPTION_URI_PATH,
                                                coap_opt_length(path),
                                                coap_opt_value(path)));

coap_add_optlist_pdu(request, &optlist);
Call coap_add_data to set the payload:
const char *data = "this is the payload";
coap_add_data(request, sizeof(data), data);
Next the coap_send enqueues the message to the server:
coap_tid_t tid = coap_send(session, request);
if (tid == COAP_INVALID_TID) {
  exit(6);
}
Note that this won’t send the message. To send it you must call coap_run_once regularly. This runs until the exchange has completed:
while (!coap_can_exit(ctx)) {
  coap_run_once(ctx, 1000);
}
The second parameter is a timeout (in milliseconds) for the read loop.
Shutting down
Cleaning up and shutting down is quite simple. Delete any option lists you have created, release the session
and free the context before calling coap_cleanup:
coap_delete_optlist(optlist);
coap_session_release(session);
coap_free_context(ctx);

coap_cleanup();
}
A complete working example is available at GitHub.
Getting everything set up
It’s quite easy to get a Raspberry Pi up and running nowadays. I’m using a Raspberry Pi Zero so the majority of Raspberry Pis will work for this. The Raspberry Pi Imager gets a new image ready in a few minutes and since I can’t be bothered with digging out yet another HDMI cable so I’m adding the usual /boot/ssh,/boot/userconf.txt and /boot/wpa_supplicant.conf files before unmounting the image.
Plug in the SD card, connect USB power and since mDNS via Avahi is turned on by default you should be able to run ssh pi@raspberry.local a minute or two later.
Change the default password (via passwd) and set the hostname via sudo hostnamectl and editing the /etc/avahi/avahi-daemon.conf file to get the appropriate mDNS name. To make my life a little bit easier I’m adding my ssh public key into ~/.ssh/authorized_keys so I won’t have to bother with passwords anymore.
Start by cloning the repository from Git:
git clone https://github.com/lab5e/libcoap-dtls-sample
Then install the libcoap development headers:
sudo apt-get install libcoap2-dev gcc
..and you’re set. Build it by running cd ~/libcoap-dtls-sample && make.
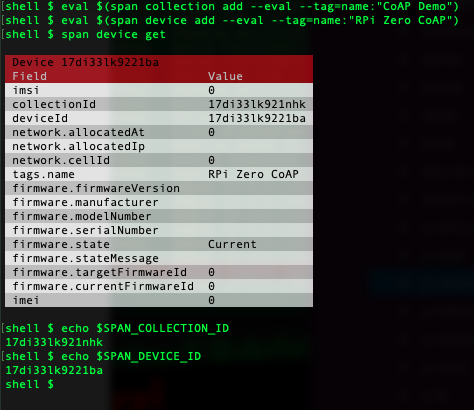
To run the sample you’ll have to get hold of a client certificate for the device. Run the Span CLI to create a new collection and device:
eval $(span collection add --eval --tag=name:"CoAP Demo")
eval $(span device add --eval --tag="name:"RPI Zero CoAP")
The eval command is just for convenience. This will set an environment variable that the Span CLI will use later and it saves us a bit of typing.
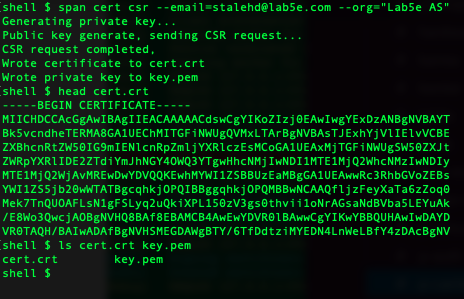
span cert csr --email=[email address] --org="[org]"
This should leave you with two new files in the current directory – cert.crt with the client certificate and key.pem with the private key.
If you’re running the Span CLI on a different computer copy the two via scp:
scp cert.crt pi@raspberry.local:libcoap-dtls-sample/
scp key.pem pi@raspberry.local:libcoap-dtls-sample/
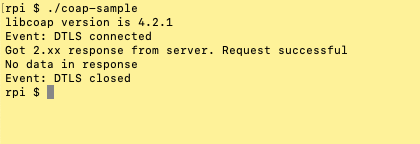
SSH into the Pi Zero and when you run the sample it should connect and send a sample message:
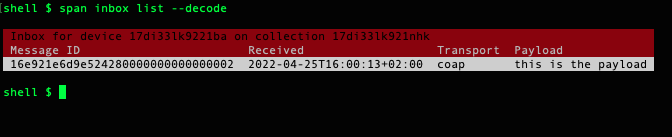
Either go to the Span Console to see the payload or use the Span CLI:
span inbox list
You can add --decode to the command line to decode the payload. Note that this might give unpredicatble results if the payload isn’t in plain text:
Downloading messages from the server
You can enqueue messages to the client with the outbox command. The next time the device sends a payload to the server it will get the enqueued message from the server.
Start by adding a new message via the Span CLI:
span outbox add --format=text Hello this is a downstream message
If you run span outbox list before you run the sample program you’ll see that the message state is set to pending. Once the message is delivered it wil be flagged as sent:

Play around with the inbox watch and outbox watch to see messages in real-time from the device:
